Error E8 in Daewoo washing machine
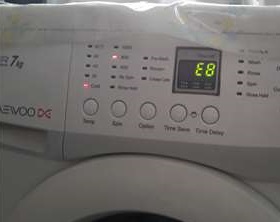 If the Daewoo washing machine displays “Error E8” on the display, then serious diagnostics are ahead. Troubleshooting is complicated by the fact that several elements of the system can lead to such a code at once, from the tachogenerator and engine to the control board. To localize the problem, you will have to consistently check all possible “culprits”. It is difficult to do this without the help of professional craftsmen, but it is possible if you follow our instructions.
What does this code mean?
You can see the E8 error on both Daewoo models with vertical loading and front-loading washing machines. The year of manufacture of the machine does not matter: both modern and outdated machines are at risk. As for the source of the trouble, the manufacturer provides the following decoding of the code:
- breakdown of the tachogenerator responsible for regulating engine speed (also called the Hall sensor);
- malfunction of the control module (more precisely, burnout of one of the board elements, most often the motor control triac);
- engine failure.
It is not recommended to independently diagnose and repair the control board, as this will require extreme care, special knowledge and equipment.
Inspecting the machine during operation will help to more accurately determine the cause of the problem. So, if the washing drum does not accelerate to the set speed, rotates slowly or even stands in the middle of the cycle, then first we check the motor. When the machine, on the contrary, accelerates too much or constantly jumps from minimum to maximum, then you should pay attention to the Hall sensor. But most often a faulty board makes itself known, so it is better to first diagnose the control module.
Testing the elements of the control board
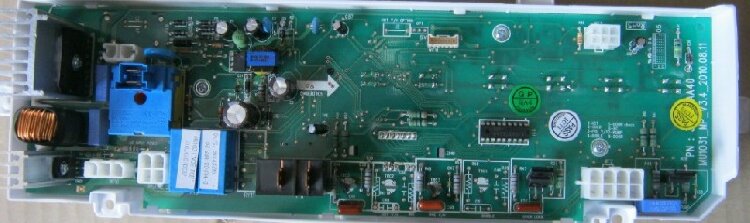
So, you have decided to repair the control board yourself. Then you will have to figure out on your own which element on the module responsible for the operation of the engine has failed. In order not to guess and experiment, it is better to make your task easier with a circuit diagram of the electronic unit. It is usually found in the washer's factory instructions.
Mechanical damage to the board, burnt contacts and disconnection of electrodes can be seen with the naked eye.
Next, we disassemble the top part of the machine and carefully remove the board. Before starting testing with a multimeter, we inspect the module on both sides, trying to see obvious scratches, chips, loose contacts, burnt tracks or broken electrodes. If such damage exists, a comprehensive diagnosis is not needed - it is only necessary to eliminate the identified problem. When everything is visually in order, it is worth checking a number of board elements one by one.

- Capacitor. A burned out capacitor often leads to error E8. On washing machine units it acts as a stabilizer and takes the blow from power surges. It is impossible to repair a burnt element; you will have to dismantle the “box”, select a similar one and solder it with a lamp in the free space. If you additionally install filters, you can reduce the risk of re-ignition. But keep in mind that the condensate is connected to the board only to the positive electrode, and a multimeter is used to check the circuit resistance.
- Resistors. The most common cause of board burnout is sensitive resistors.To correct the situation, you need to test the module by measuring the resistance with a multimeter. First, the probes are connected to the first line, where the value should be close to 8 ohms and the overload indicator less than 2A. Next, the second line is evaluated, where the reboot is limited to 3-5A. The final resistance depends on the frequency of the block, for example, for a simple circuit the parameter will not exceed 10 Ohms. If deviations from the norm are recorded, then the elements need to be re-soldered. Professionals also recommend replacing filters.
- Thyristor block. It fails if the network was reloaded above 220 W or there was impulsive interference. In this case, it will be difficult to carry out repairs yourself, but quite possible. First, we measure the negative resistance of the board, which on first-order diodes should not exceed 20V. Output contacts rarely burn out, but they also need to be checked. We take a tester, clean the cathode and evaluate the performance. When the average value fluctuates within 12V, the test is passed, but in other cases, we change the faulty filter. We purchase a new element and solder it through the positive contact to the thyristor unit. The main thing is to monitor the condition of the flimsy but expensive ports, and thoroughly clean the module upon completion of work.
- Trigger. It breaks down due to capacitor failure. Diagnostics is carried out using a multimeter, which is connected to the output contacts and a filter installed nearby. If the first indicator on the tester is approximately 12V, and the second is approximately 20V, then everything is in order. Otherwise, it will have to be repaired, which will take a lot of time.First, the output valves are sealed, then a new trigger is mounted, and the threshold voltage and resistance on the modulator are measured. The main thing is to be careful with the capacitor cathode (it can easily be touched and damaged when soldering the “neighbor”).
These are the main “sore spots” on the control board, which can lead to the display of fault code E8. You can check and repair them yourself, but only if you have experience and practical knowledge. If the module diagnostics did not help to detect the problem, then we turn our attention to the engine and tachogenerator.
Checking and replacing the tachometer
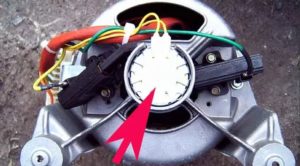
If everything is fine with the control board, then we look for the problem inside the washing machine - on the motor. Error E8 indicates a problem with the tachogenerator. To check the sensor and replace it if necessary, you must proceed sequentially.
When disassembling the washing machine, remember the safety rules: disconnect the machine from the power supply, water supply and sewerage.
- Disassemble the machine. Disconnect from the network and communications, unscrew the bolts holding the back panel and remove it. Next, you should release the drive belt by pulling the rubber while turning the pulley.
- Remove the motor. Record the location of the connected wires on the camera, unscrew the bolts securing the engine and, shaking the engine back and forth, remove the part from the housing.
- Inspect the tachogenerator. First, you should check whether the contacts have come loose or whether the fastenings have become loose. Such a breakdown can be easily corrected: we restore the connections or strengthen the fixation.
- Check resistance. Verification is carried out in two ways. In the first case, it is enough to measure the resistance with a tester by opening the connectors and moving them away from the sensor.Normally, the contacts show approximately 60-70 ohms. The second option involves measuring with a tester in voltage mode, when the probes are applied while simultaneously cranking the motor. In operating condition, the indicators constantly change within 0.2V.
- Assess the condition of the wiring. The tachometer itself rarely fails, so we inspect the integrity of the conductors.
- Replace the Hall sensor. If a breakdown is detected, the faulty tachogenerator must be dismantled and a new one installed.
After the repair, we start the cycle and see if error E8 has disappeared.
If both the tachogenerator and the board are working, then the motor has probably failed. With such a problem, it is better to contact a specialist who will tell you what to do and in what order.
Interesting:


Reader comments
- Share your opinion - leave a comment
Categories
Washing machine repair


For buyers


For users


Dishwasher


Add a comment