Connecting the motor from the Vyatka-automatic washing machine
 Vyatka-automatic washing machines, produced by the Kirov Vesta plant, have been produced since 1981. At that time, equipment was assembled “to last,” so these models were equipped with powerful and extremely reliable electric motors. And even after 20-30 years, these engines, in most cases, can still perform their functions.
Many people have these “eternal” motors collecting dust in their garages, which can be used in various homemade devices. For example, make a lathe or sanding machine, or a small concrete mixer. Let's figure out how to properly connect the electric motor from the Vyatka-automatic washing machine. We'll tell you how you can test the engine for performance.
Engine connection diagram
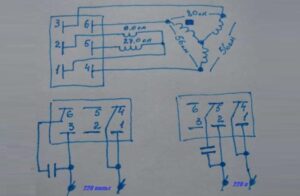
The motor from the Vyatka-automatic washing machine is designed to operate in a single-phase network. The motor of the machine consists of a pair of reverse and a pair of working coils. Together with the starting capacitor, they set the direction of movement of the rotor.
Vyatkas of different years of production have excellent engine modifications. However, in general, the technical characteristics of the motors are approximately the same. All electric motors had only two rotor speeds - up to 2200 rpm during spinning, and up to 450 rpm during the main wash.
The electric motor from a Vyatka-automatic machine may have 5 or 6 terminals for connection (motors with 8 terminals are extremely rare).
Regardless of how many pins your motor has, 5 or 6, the connection diagram will be identical.It’s just that in motors with six terminals, contacts 1 and 4 need to be “short-circuited” and a common terminal must be created for inclusion in the electrical network.
With the simplest connection of the engine from the Vyatka-automatic machine (directly to the outlet, without a capacitor and toggle switch), you will need:
- mains plug;
- three wires with plugs.
A separate wire with a plug must be connected to one end of the plug, and a bifurcated cable with different plugs must be connected to the other. Next, we find terminals 1 and 4 on the electric motor. The numbering of the connectors can be seen directly on the plastic case that protects the pins.
The first and fourth terminals must be connected to each other on one wire, so the plugs of the “bifurcated” wiring are connected to them alternately. The second, separate cable is connected to terminal No. 2. After this, you can plug in the plug and the rotor will begin to rotate.
To ensure the reversal of the electric motor, that is, changing the direction of rotation of the rotor to the opposite, you will have to constantly manually swap the position of the ends of the winding. For convenience, it is better to immediately include a toggle switch in the circuit - then the movement of the motor can be switched with a click.
In addition, to protect the engine from increased loads, it is advisable to include a capacitor in the circuit. In Vyatka-automatic machines, a starting device with a capacity of 16 microfarads and a voltage of 500 V is installed as standard.
The connection diagram for a motor with reverse, a toggle switch for adjusting the speed of rotation and a starting protective capacitor is shown in the figure.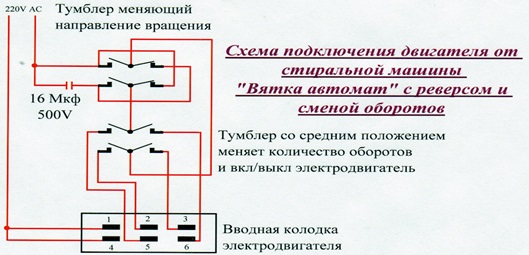
Thus, contacts 1 and 4 of the electric motor are also “shorted” together with a bifurcated wire and connected to one of the plugs. Further connection occurs according to the diagram.The second and fifth terminals are connected to the terminals of the first toggle switch, which will change the speed of the motor and turn the engine on/off. Here, to the opposite contacts, outputs 3 and 6 are connected in pairs.
Next, a toggle switch for reverse is added to the circuit. It is connected by wires to the middle switch, its diagonal contacts are powered together. The common wire is connected to the starting capacitor, from which the network cable is connected to the plug. What the design will look like is shown in the figure below.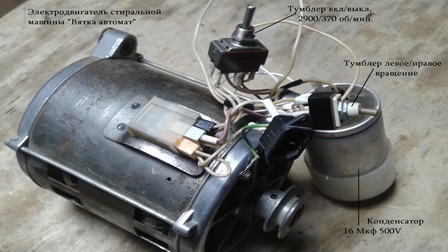
If everything is done correctly, the engine from the Vyatka car will easily start in both directions. It is important to secure the motor well in place before use, otherwise it may damage its own wiring during operation.
You can switch the direction of movement with the toggle switch only after the rotor has completely stopped.
Engine test
If you find an engine from a Vyatka-automatic machine in the garage that has been collecting dust on the shelves for a long time, and you want to use it on the farm, but you don’t know whether it’s working, diagnose the device. To test an electric motor, you will need the simplest multimeter and a special digital meter for power, voltage, and current. You can purchase devices in specialized stores or on the Internet.
To begin with, it is better to measure the resistance of the motor windings with a multimeter. Switch the tester to the appropriate mode and alternately lean the probes against pairs of contacts. Normally, the indicators on the device screen will be as follows:
- when measuring resistance between terminals 1 and 5 - 23.2-26.8 Ohms;
- between 1 and 2 contacts – 8-9.2 Ohms;
- 4 and 3 – 51.1-58.9 Ohms;
- 4 and 6 – 51.1-58.9 Ohms;
- between 3 and 6 – 71.6-82.4 Ohms.
If the winding resistance meets the standard values, the motor can usually be used for secondary purposes. However, it is better to perform a more complete diagnosis and check how the motor holds and copes with loads, whether it overheats, and what speed it produces. For these purposes, you will need a special power, voltage and current meter.
Ideally, the measurement results at low and high speeds should be the same both when the rotor rotates clockwise and counterclockwise. If everything is normal, then when the engine accelerates to 370 rpm, the measuring device should produce approximately the following indicators:
- voltage 220-230 Volts;
- power – 290-310 Watts (the figure depends on the specific engine model, perhaps your electric motor will be more powerful);
- current strength - 1.4-1.5 Amperes.
As the RPM increases, the results should be similar. If the electric motor is normal, you can connect it according to the diagram described above. It can become the basis for creating many useful household devices: an emery or lathe, grain or apple crushers, lawn mowers, concrete mixers, etc.
Interesting:


Reader comments
- Share your opinion - leave a comment
Categories
Washing machine repair


For buyers


For users


Dishwasher


Add a comment