How to install a Whirlpool dishwasher?
 Naturally, installing a Whirlpool dishwasher is not difficult even for those who have never used such equipment before. However, this is a long process, with a large number of features that should be taken into account during connection. Where to place the device, what distance to choose from the sewer and water supply, what tools are needed for work, how to carry out the initial setup - we will tell you about all this today.
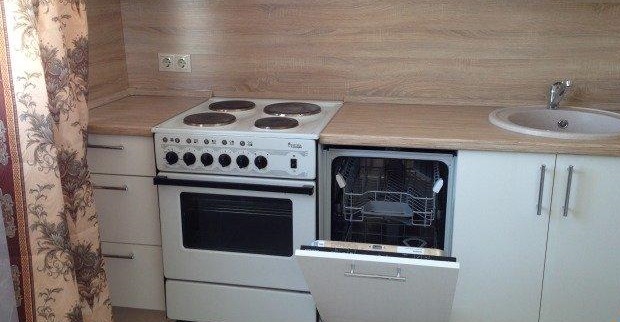
Let's find a place for a dishwasher
The first step before purchasing a device should be to find a suitable location for the dishwasher. It is not advisable to place the machine next to other large household appliances, and it is also always worth considering that it is a rather large device, so it will not fit well in every kitchen and bathroom. Carefully calculate the LPV of your future home assistant so that she fits well into the room, and also take into account a number of nuances.
- Communications. There must be a 220 V socket next to the machine, preferably with protection from moisture, a water supply, and also a drain. It is important to consider the length of the dishwasher drain hose - it should be 1.5 meters or shorter, otherwise the load on the pump will be too great, which may cause it to break.
- Heat sources. The PMM should not be placed next to heat sources, as this has a negative effect on its performance and durability. For example, you should avoid proximity to refrigerators, gas boilers and old electric stoves that get too hot. This does not apply to modern electric stoves, because they have minimal heating of the outer surface of the body.
- Washing machine.This is also a very bad neighbor for a dishwasher, because vibration from the washing machine can not only break the dishes, but also damage the PMM itself.
- Kitchen set. The edge of kitchen furniture is also a bad idea, since full-size washers are simply built under the countertop, while their sides have to be additionally covered with something, which entails additional costs.
As a result, the best reference point for installing the device is the kitchen sink - the easiest way is to install the machine to the left or right of it, where all the necessary communications will be at hand.
What is needed to connect the PMM to communications?
To a greater extent, tools will be needed only to connect communications, while some of the list may not even be required. If you need to connect a built-in dishwasher with a facade hinge, then the list of tools and consumables is as follows:
- an adjustable wrench required to connect the tee to the water supply;
- a Phillips screwdriver, which is needed for hanging the facade;
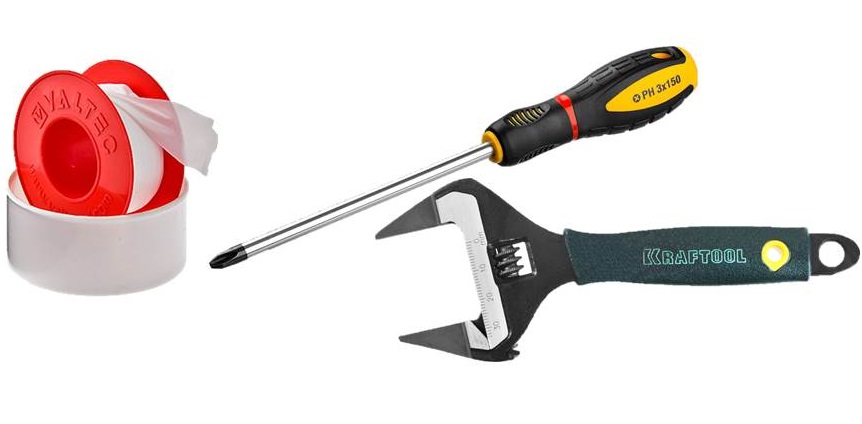
- FUM tape and plumbing tape, with their help we will fix the drain hose;
- a flexible hose for supplying water to the machine, the length of which will be sufficient.
In specialized stores and in sets of expensive PMMs you can find hoses with an aquastop protective mechanism, which can protect your apartment from water leaks, so it is better to choose only this type of flexible hose.
This completes the list, however, if there is no place in your house where you can connect the water intake hose, you will also have to purchase a tee. It will be most convenient to install it on the water supply to the kitchen faucet.
We provide water supply to the machine
The dishwasher has been purchased, a level place for installation has been selected, all communications are accessible, and the hoses and power cord reach the connection and outlet.
Most modern dishwashers can only be connected to cold water, but there are models that can also work with hot water. The easiest way to connect the PMM is through a tee with a tap, which is suitable for connecting dishwashers and washing machines.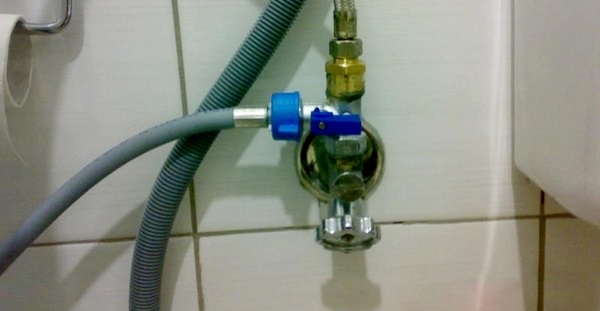
It can be installed on a water supply pipe with a ¾-inch thread, and then connect the flexible mixer hose to the tee. With this manipulation, you will be able to turn off the water supply separately for the dishwasher. Do not forget to turn off the cold water in the house before work, and also make sure that the thread is securely fixed with FUM tape.
As for the supply hose, you should screw it onto the water intake of the machine by hand, since it has rubber seals, so tape or tape is not needed here.
We provide waste water discharge
Next, you need to install the PMM drain hose, which should have a bend at a height of about 60-70 centimeters from the floor level. It is also important to ensure that the end is not submerged in water, otherwise it will suck water back into the dishwasher. This cannot be allowed, so there are two ways to prevent this: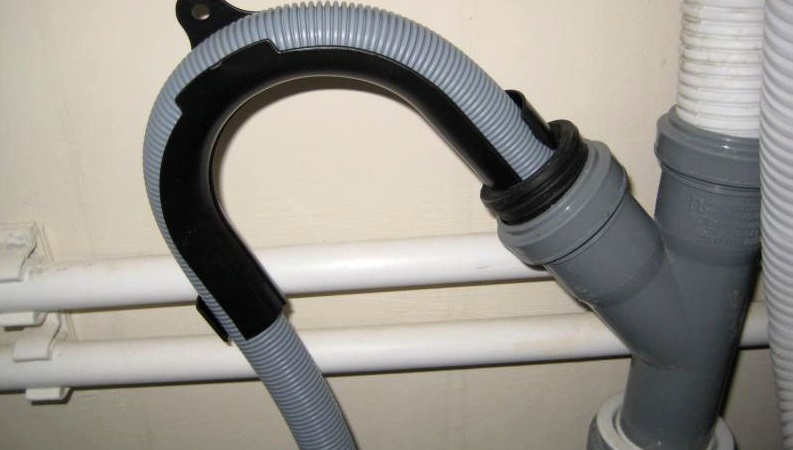
- connect the hose to the siphon. This is the easiest way to do this, but for this purpose a special liner must be provided on the siphon;
- connect the hose directly to the sewer, or using a tee. Most often, this method is used when the dishwasher is located far from the washing area. The length of the hose should be less than 1.5 meters, so extending it is dangerous, so you have to connect it to a sewer pipe.
The first method is much better, as it is much lighter and also helps protect the house from unpleasant odors. Protection is achieved through a water plug located in the sink siphon.
Electrical supply and door front
For power supply you need one outlet, which will be located close to the PMM. This is a mandatory condition, since the power cord of machines is rarely longer than 1.5 meters. In addition, it is important that the outlet is grounded, has protection in the form of a circuit breaker, and is also protected from water.
For increased protection of the electrical network, it is recommended to run the dishwasher through a voltage stabilizer, which can save equipment and save the house from fire.
The door front is even simpler, since it is usually hung on full-size built-in machines. To do this, manufacturers leave in the kit an installation kit - brackets, screws, etc.
But do not rush to hang the door - it is better to do this as the last step, when the machine is installed and fully configured. To do this, you only need to secure the fixing strips with self-tapping screws, and then attach them to the facade door. The official instructions should contain a detailed description of the door installation, so any PMM owner can handle this.
We put the PMM into operation
Now there is the last, not the most difficult, but the most important step - preliminary setup before the first launch. After connecting the dishwasher to all communications, under no circumstances should it be started immediately, as fine tuning is first required. What is needed for this?
- Set the salt consumption level. The harder the water in the house, the higher the level should be set.Water hardness can be determined by special tests, and it can also be determined visually. For example, if the water is hard, then white stains will remain on the electric kettle and on the sink.
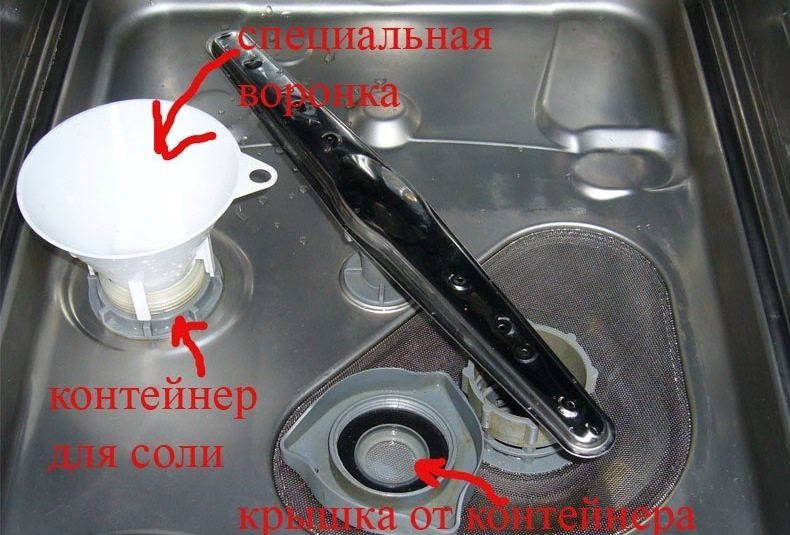
- Place salt in a container. The container is located at the bottom of the PMM and is closed with a separate lid. Before the very first wash, this compartment must be filled with water to the brim, then add salt and be sure to screw the lid tightly so that no detergent gets into the compartment.
- Now you need to pour in the rinse aid and detergent. At first, it is better to add a medium amount of rinse aid to check how well the dishes are washed. If you are satisfied with the quality of the wash, you can try reducing the quantity, or adding more if the plates do not shine or dry very slowly.
After these three points, the machine can be turned on. Sometimes the device will activate the rinse aid and salt indicators, indicating that these compartments need to be filled. If you have already added everything, then you can load the first batch of dishes and start the wash. After the test cycle, be sure to check all communications for water leaks.
This completes the installation and initial setup of the dishwasher. If all communications are accessible, you have the necessary tools at home and all consumables have been purchased, then there should be no problems. Follow all recommendations from the instructions, use the machine carefully and carry out diagnostics on time. Monitor the amount of rinse aid and salt, clean the filters from food residues, and then the device will serve you well for many years.
Interesting:


Reader comments
- Share your opinion - leave a comment
Categories
Washing machine repair


For buyers


For users


Dishwasher


Add a comment