What sealant should I use to seal a washing machine drum?
 The procedure for removing old and installing new bearings involves cutting the plastic tub of the washing machine. But after repair, the sawn parts must be reassembled into a single whole and securely fastened. Is there any kind of sealant for gluing the tank of a washing machine or will you have to make do with improvised home remedies and how is the tank glued in general?
What adhesive sealant should I use?
It is worth considering that the sealant gluing the tank must be resistant to contact with water, pressure and temperature changes, as well as vibration. Several different adhesive-sealants are suitable for such purposes; there are plenty to choose from.
- Permatex 81730. The average price of the product is $1. It is transparent in appearance and very viscous in texture. Its main purpose is gluing car windows and headlights. Thanks to this, it can easily tolerate high temperatures and is not afraid of contact with water. The temperature range for using glue is from -62 to 232 degrees Celsius.
- Polyurethane adhesive F5. 310 ml canister. costs about $7. Such a high price is due to super-tightness. After gluing the tank with such a sealant, you will subsequently need to saw it again.
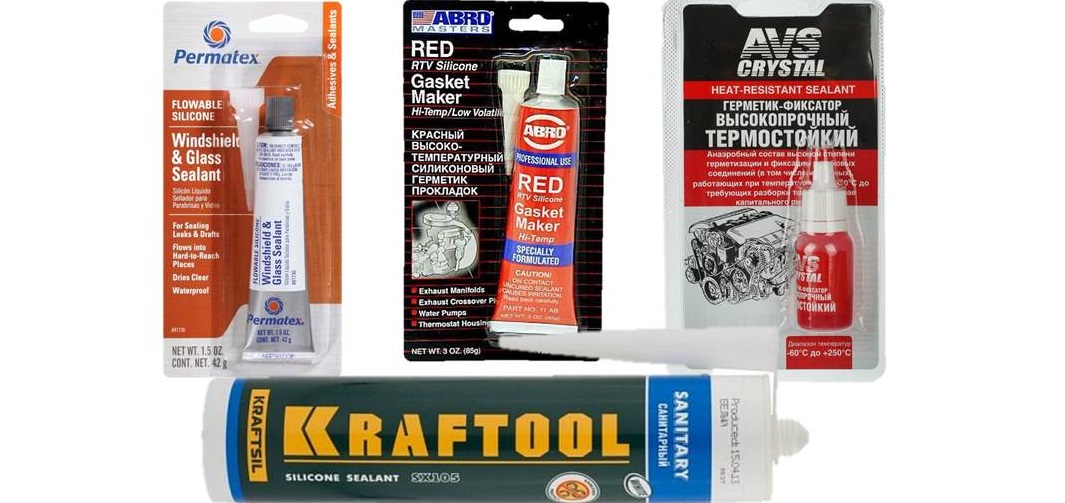
- ABRO 11AB-R. The cost of glue is about $3. Resists any extreme conditions and is therefore not susceptible to high temperatures or aggressive chemical elements.
- Craftul. The high elasticity of the substance is due to its purpose: it should be used for gluing joints in electric motors.It can withstand heat up to 200 degrees, and one tube costing $2 is enough to glue four washing tubs together.
- AVS AVK-131. Another super sealed product, after which it will not be possible to disassemble the tank; you will have to cut it again. The sealant can withstand heat up to 2.5 thousand degrees.
Attention! The latest glue is sold in mini-packs, the volume of which is only 6 ml. To glue the tank properly you will need at least two. The price for one piece is around $1.
Requirements for connecting tank halves
Once the new bearings are in place, the two halves of the tank need to be turned back into one. The person carrying out the repair may have a question: how to do the gluing so that there are no problems later. It is recommended to use either glue or heavy-duty sealant.
Before you start gluing the tank, you need to connect its halves using nuts and screws. To do this, you need to make holes along the entire seam of the plastic tank. An airtight mixture is needed to fill the gaps that form between the joints. When choosing an adhesive, you need to consider how the element works: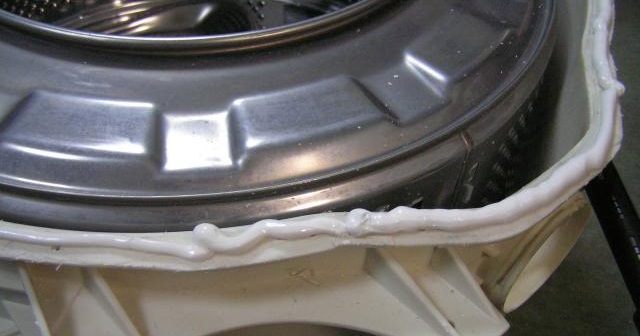
- the tank is constantly exposed to strong mechanical stress, so it is necessary that the adhesive substance can withstand the load;
- he often has to be exposed to fairly high temperatures (over 90 degrees), and then to sudden cooling, and so on regularly;
- The assembly is not only constantly in contact with water, but sometimes also in contact with water under pressure.
If the sealant is water permeable, a leak will inevitably occur, and then, in order to avoid damage to serious components of the SM, it will be necessary to disassemble and glue the tank from scratch.
Glue it correctly
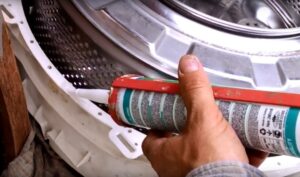
Before starting cutting, it is worth preparing the part in advance for subsequent gluing. To do this, before sawing the tank, you need to make around 30-40 holes around the perimeter of the seam. During assembly, the parts of the tank must be aligned so that the holes of the halves match. Next, the joint of each half is treated with alcohol, and then glue is applied to it around the perimeter. Afterwards, all that remains is to screw in the bolts as quickly as possible, while the sealant has not yet hardened. Complete drying occurs within 120 minutes.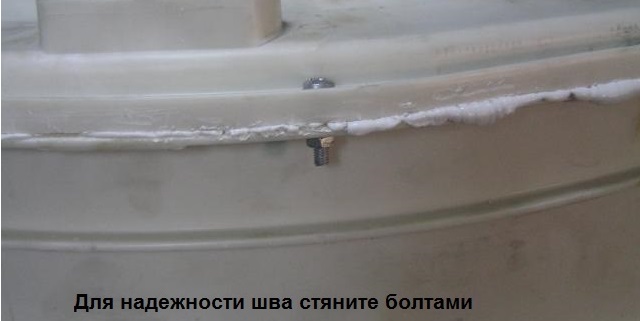
Screwing in the bolts is necessary so that over time the seam does not weaken and leak. The process of connecting the tank with bolts is as follows:
- a washer is placed on the bolt;
- it is inserted into place;
- the second washer is installed;
- the nut is tightened.
After the holes are made in the tank, accurately calculate the number of bolts, nuts and washers. Experts say that in this type of repair it is preferable to use washers with narrow margins.
Interesting:


Reader comments
- Share your opinion - leave a comment
Categories
Washing machine repair


For buyers


For users


Dishwasher


Add a comment