Ardo washing machine malfunctions
 All large household appliances fail sooner or later. A trusted brand and high-quality European assembly do not guarantee trouble-free operation - carelessness of the user, manufacturing defects, and unstable power supply often lead to breakdowns. Some manufacturers also have typical “weak points”. We suggest you find out what are the known typical faults of the Ardo washing machine. Let's look at the signs of breakdowns, the progress of diagnostics and repairs.
Common fault codes
Modern Ardo machines greatly simplify troubleshooting and troubleshooting due to the built-in self-diagnosis system. Thanks to it, the washing machine is capable of automatically recording failures and displaying error codes on the display. The user just has to remember the combination and decipher it according to the factory instructions. If there is no screen on the model, the corresponding indication will turn on.
Washing machines from Ardo are characterized by problems with draining, heating and water supply.
There are dozens of codes in the self-diagnosis system database, but most often the Ardo displays 3 combinations - F2, F4 and F8. Each of them reports a specific problem:
- F2 – no water heating (the heating element or temperature sensor is not working correctly);
- F4 – the drain system does not function (the garbage filter is clogged, the drain hose is clogged or the pump is broken);
- F8 – the tank has been overfilled (the pressure switch has failed).
The beauty of the self-diagnosis system is that there is no need to carry out complex diagnostics of the washing machine. The machine itself determines the location of the problem, and the user remains to clarify the breakdown and eliminate it during the repair.You just need to correctly decipher the combination using the instructions included with Ardo.
Checking the heating element
A tubular electric heater, or heater for short, is one of the most vulnerable parts of any large household appliance. The trend continues with Ardo washing machines. Moreover, here the situation is complicated by the unfinished design of the element. The coating used on it is considered to be of poor quality, since it does not protect against scale, but, on the contrary, provokes its formation. As a result, the spiral quickly becomes overgrown with a thick layer of limescale, overheats and breaks, to which the system reacts with the “F2” code.
To avoid scale deposits on the heating element, it is necessary to organize a comprehensive water filtration system and regularly use special softeners.
It is strongly not recommended to operate the washing machine with a non-working heating element. Firstly, the quality of the wash will suffer, as the water will stop heating. Secondly, if you constantly try to “warm up” the machine, you can also lose the control board - it will freeze and fail. It’s better not to delay, but to immediately begin diagnosing the heater with your own hands. We proceed like this: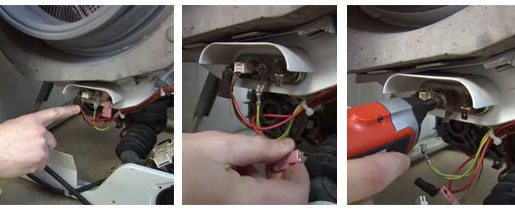
- unfold the machine with the rear panel facing forward;
- unscrew the “back” and put it aside;
- we find a heater under the tank;
- we attach the probes to the contacts of the device;
- We evaluate resistance indicators.
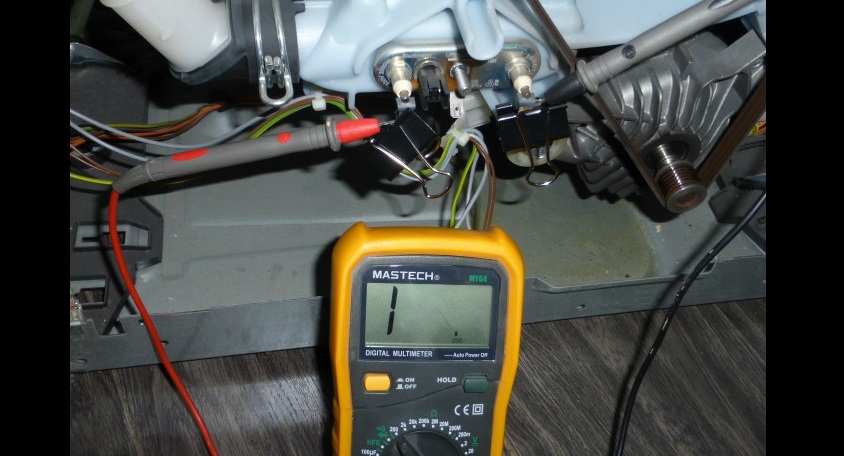
A working electric heater should have a resistance of 20-40 ohms. If the displayed value is close to zero, it means the device has failed. It cannot be repaired - only install a new heating element. Dismantling the heating element is simple. It is enough to disconnect the wires connected to the “chip”, loosen the central fastener, press in the pin and remove the part out.The heater is installed in the same way, only in the reverse order. The main thing is to choose a suitable replacement - with an identical serial number and only from a branded supplier. “Alien” devices will quickly break down or come into “conflict” with the control board.
Checking and changing the pump
Common problems with the Ardo, as with many other machines, include drainage problems. This includes blockages and breakdowns of all drainage elements: from the garbage filter and drain hose to the pump and impeller. To identify and eliminate the malfunction, it is necessary to sequentially check all the listed parts. You can get to the drain system through the technical hatch door. This is a false panel at the bottom of the case, which can be removed with a screwdriver. Simply lift the cover and unclip the latches. Next we proceed in the following order:
- unscrew the garbage filter and, if necessary, clean it of debris;
Be ready! When you unscrew the filter, water will flow out of the machine!
- we wash the seat freed from the filter;
- We use a flashlight to shine through the hole and find the pump impeller - blades;
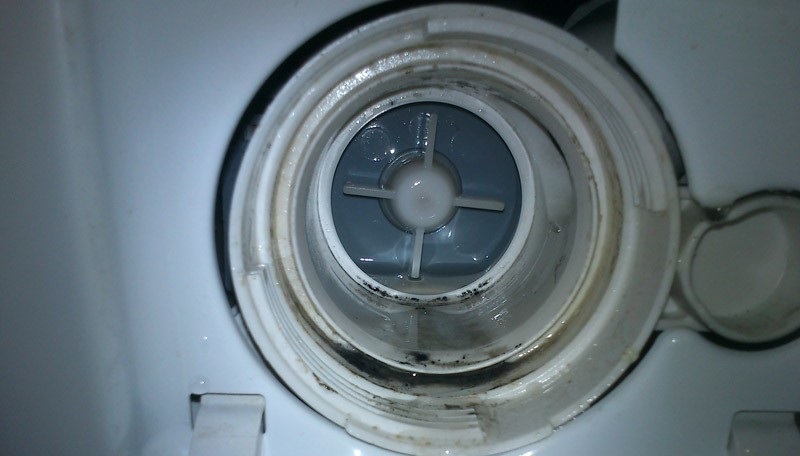
- Using a long object, we try to spin the impeller.
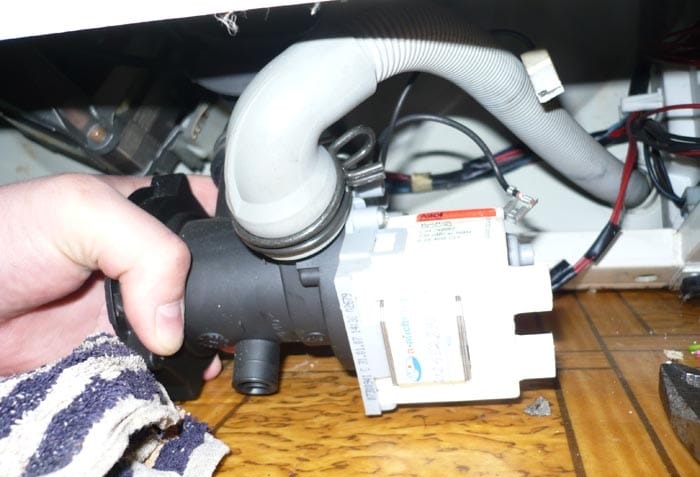
The impeller should rotate freely. If the blades move with difficulty or become stuck, it means they are blocked by debris. You will have to start cleaning it by first removing the pump from the machine. For further diagnostics, the washing machine must be placed on its left side. It is important to act carefully and lay a carpet or a bunch of rags on the floor - for a soft and safe lowering of the heavy machine gun. You will have to get to the pump with the impeller through the bottom. First, we check the pump using a multimeter.
- We cling to the contacts with the probes.
- We put the mark “up to 700 V” on the tester.
- We connect the washing machine to the power supply and run the “Drain” program.
- After 2-3 minutes, we evaluate the values on the multimeter (if the pump does not hum at 220 V, it means it is faulty).
The pump is not repaired - only replacement. First, we dismantle the old device: disconnect the wires, unscrew the retaining bolts, press down the housing and remove it from the grooves. Then we take a new pump, fix it in the “socket”, return the wiring and pipes. At the finish line, raise the Ardo to a vertical position and run a test wash.
It's time for the pressure switch
If error “F8” occurs, the pressure switch must be checked. The level sensor may be broken or clogged, making it unable to accurately assess how full the tank is.. Diagnostics will help confirm your guess, which will not take much time. Just follow these short instructions:
- disconnect the washing machine from the power supply and “cut off” from the water supply;
- unscrew and move the top cover to the side;
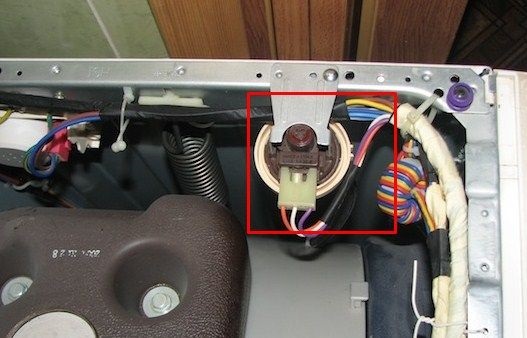
- near the right side wall, find a pressure switch - a plastic “box” with a long tube lowered into the tank;
- find a tube commensurate with the fitting;
- unhook the hose from the pressure switch housing;
- Place the found tube against the fitting and blow into it.
Diagnostics of the pressure switch also includes inspection of the hose connected to the sensor - it often wears out and allows air to pass through, creating interference in measuring the pressure in the tank.
The air flow should close the contacts, to which a working device will respond with a few clicks, while a broken one will remain silent. The diagnosis does not end there: we inspect the hose for blockages and damage, and, if necessary, rinse it under the tap. If a visual check does not reveal any problems, then we additionally test the device with a multimeter:
- turn on the tester in the “Ohmmeter” mode;
- We bring the probes to the sensor contacts;
- We evaluate the resulting resistance (changed indicators will confirm the serviceability of the device).
If the pressure switch does not respond with clicks, is damaged or shows abnormal resistance, then the relay must be replaced. Repair does not make sense - a new sensor is cheap, and repairing it at home is almost impossible. To replace it, a new pressure switch is purchased and the old one is dismantled. In the latter case, disconnect the pipes and wires connected to the sensor, loosen the clamps and remove the device from the housing. Install a working relay in the reverse order.
Interesting:


Reader comments
- Share your opinion - leave a comment
Categories
Washing machine repair


For buyers


For users


Dishwasher


Add a comment