How to check a washing machine capacitor with a tester?
 It is quite simple to understand that something is wrong with the starting capacitor of an electric motor. The malfunction can be determined visually - the body of the part is deformed and swells at the top. In some cases, the device looks normal in appearance, so you will have to test it with a multimeter. Let's figure out how this is done.
Testing a polar type element
How to check a washing machine capacitor with a multimeter? The work can be done at home, with your own hands. Diagnostics of starting devices should be performed by removing them from the electrical circuit. Due to this, more accurate readings can be obtained.
An automatic washing machine can be equipped with a polar or non-polar capacitor. When checking a device of the first type, one important condition must be met - its capacitance must be more than 0.25 μF. Let's figure out how to ring such a part with a tester.
The technology for diagnosing a polar capacitor with a multimeter will be as follows:
- short-circuit the capacitor with tweezers, a fork, pliers, a screwdriver or other metal object. This is necessary to discharge the device. If done correctly, a spark will appear;
- switch the tester to ohmmeter mode;
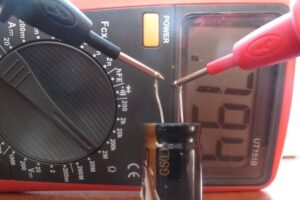
- lean the multimeter probes against the contacts of the capacitor, remembering to take into account the polarity;
- evaluate the readings on the device display.
When diagnosing a polar capacitor, connect the red multimeter probe to the plus, and black to the minus.
If the tester beeps and the display shows the value “0”, then there is a short circuit. This is what led to the breakdown of the capacitor.The unit displayed on the multimeter immediately after connecting the probes will indicate an internal break. In both cases, the starting device will have to be replaced.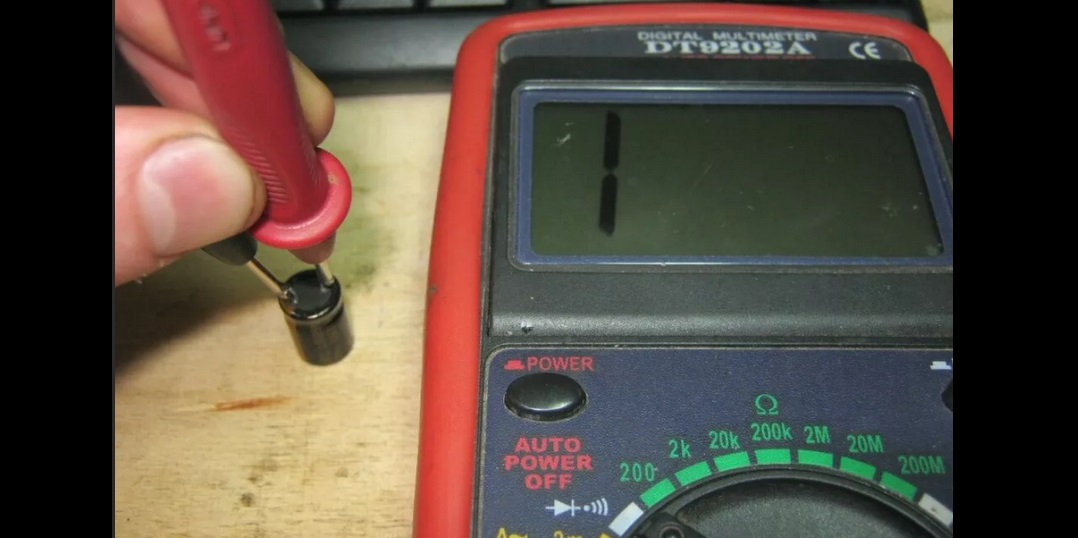
It is very important to perform diagnostics correctly, otherwise the device readings may be incorrect. For example, during measurements it is prohibited to touch the probes. The human body has low resistance, so the current will “flow” past the capacitor and the multimeter will show completely different values.
Discharging the capacitor is a necessary step before diagnosing it. Especially if the device is high voltage. This is done, firstly, for safety reasons, and secondly, so as not to damage the multimeter. The tester may burn out if the residual cell voltage is high.
Testing a non-polar element
Non-polar starting devices are even easier to ring with a tester. To begin with, the unit of measurement is set on the multimeter - megaohms. Afterwards, the probes are connected to the contacts of the capacitor. If the device display shows a value of less than 2 mOhm, it means the element is faulty.
When checking single-pole capacitors, there is no need to adhere to polarity.
If you need to check a non-polar capacitor with a voltage of over 400 Volts, then this can be done provided it is recharged from a device protected from short circuits. A resistor with a resistance of at least 100 Ohms is connected in series with the element. Such precautions will prevent a sharp “surge” of current during startup.
There is also another method for examining a single-pole starting device - checking for a spark. The part must be charged to working capacity.Then you should short-circuit the contacts with a suitable device with an insulated handle (pliers or a screwdriver). A strong discharge will indicate the functionality of the element. After a spark appears, the tester measures the resistance on the legs of the capacitor.
Checking the capacity
One of the key characteristics of a capacitor is its nominal capacitance. Over time, the indicator may decrease, and, consequently, the device will accumulate less and retain its charge worse. To check the functionality of the starting element, the capacity is measured and compared with the value marked on the case. The procedure has some specific features.
Thus, using a standard, inexpensive multimeter, it will not be possible to quantitatively measure the capacitance of a capacitor. You just need to make sure that the device works. To check the element, the tester is switched to ringing mode.
After touching the legs of the capacitor with the probes, a characteristic sound should be heard. Then the multimeter wires need to be swapped, and the squeak should repeat. It will be heard when the capacitance of the starting device is more than 0.1 µF.
The larger the working capacitance of the capacitor, the longer the multimeter will “beep” when testing the starter.
To get accurate results, you will have to find a more professional multimeter that has special contact connectors and the ability to adjust the plug to calculate the device's capacitance. Before starting diagnostics, such a tester must be set to the nominal value written on the housing of the starting capacitor.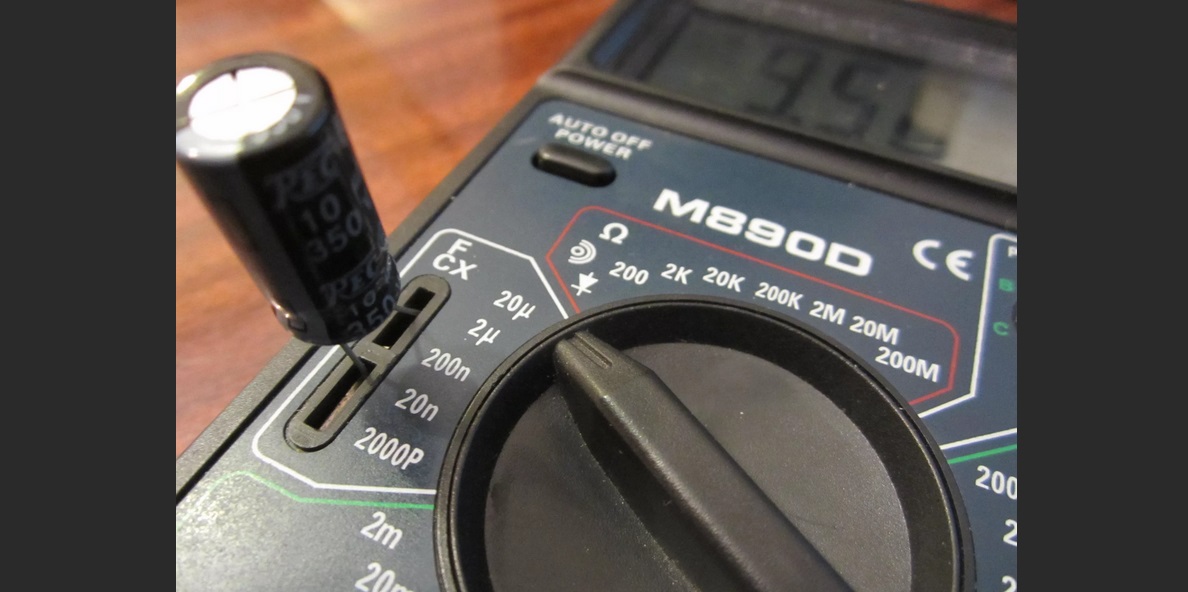
Next, the capacitor is discharged by the metal. Afterwards, its legs are inserted into special “sockets” provided on the multimeter.The tester screen should display a capacity that matches the nominal one; a slight deviation is allowed. If the indicator differs significantly from the norm, it means that the starting device is damaged.
Is the voltage correct?
Another way to make sure that the capacitor is working is to measure its voltage and compare the resulting value with the nominal value. During operation, a power source will be needed, and its voltage must be less than that of the starting device being tested.
Let's say if the capacitor is 25 Volts, then a power supply of 9 Volts will suffice. Next, you need to switch the tester to ohmmeter mode, connect its probes to the legs of the element, observing the polarity, and wait about 5 seconds.
The tester screen should display the capacitor voltage. When the value corresponds to the standard, the starting device is working properly. Otherwise, the element will have to be replaced.
Expert advice
When checking capacitors, technicians encounter a certain difficulty. During soldering, under the influence of heat, even an initially serviceable element can be damaged. However, for high-quality diagnostics, the starting device must be removed from the circuit so that it is not shunted by sensors located nearby. Therefore, some nuances should be taken into account.
When the tested starting device is soldered into the circuit, you should start the washing machine being repaired. If the operation of the machine has been restored, then it is better to remove the old capacitor again and replace it with a new one.
Another recommendation is to reduce the test time and reduce the likelihood of damage to the capacitor by desoldering not two legs, but only one.However, this option is not acceptable for all electrolytic cells. Therefore, first, think about whether this method is possible in your case.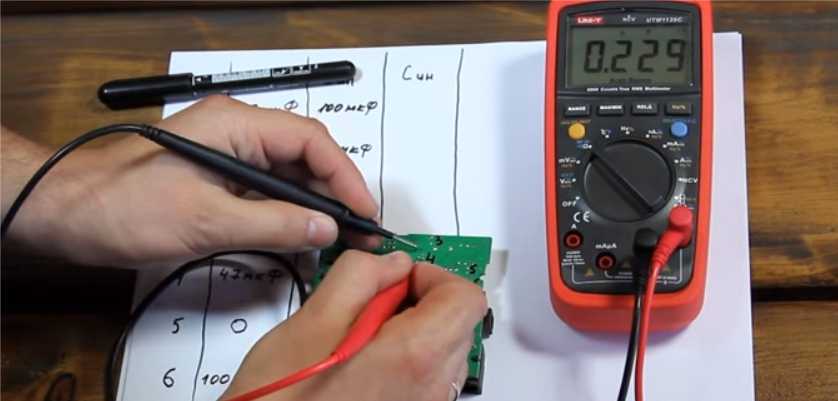
If the circuit is quite complex, with a large number of capacitors, then in order to find the faulty element, it is better to check the voltage readings of each without removing the parts. A starting device whose parameters do not correspond to the nominal value must be removed and replaced with a new one.
Having discovered that the circuit “fails,” it is necessary to check the production date of each starting device. Capacitors tend to “dry out” over time, so even if the element is in good condition, but was made 5-7 years ago, it needs to be replaced with a new one. On average, over 5 years the drying out of the part is approximately 65%, which is why the operation of the circuit is disrupted.
It is worth understanding that modern new generation multimeters are only capable of testing capacitors with a power of up to 200 µF. If the value is higher, the tester will fail. Even the provided fuse will not save the device.
Interesting:


Reader comments
- Share your opinion - leave a comment
Categories
Washing machine repair


For buyers


For users


Dishwasher


Add a comment