Dismantling the drum of an Electrolux washing machine
If, when an Electrolux washing machine breaks down, you need to check the bearings and seals, you will have to almost completely disassemble the drum of the Electrolux washing machine. At first glance, it's simple. Difficulties arise when the master gets down to business: the heaviness of the parts, a large number of fasteners, lack of space for maneuvers. However, if you clearly know the assembly diagram of the structure and prepare the necessary tools, you can fix the breakdown at home.
Tools for disassembling the device
Unlike other manufacturers, Electrolux provides the ability to replace parts. To get to the inside of the device, you need to unscrew several screws or bolts. Some parts are secured with clamps.
To troubleshoot problems, you will need a standard set of tools that almost every owner has:
flat and Phillips screwdrivers for different thread diameters;
ticks.
However, to disassemble some models, you may need other tools. We recommend that you have:
wrenches;
round nose pliers;
chisels;
hammer;
stationery knife;
universal key;
Be sure to read the device instructions before starting work.
Most Electrolux washing machines have similar design features. But to avoid mistakes, we recommend that you carefully study the manufacturer’s recommendations, paying special attention to the type of engine. Inverter-type motors are connected directly to the drum, while commutator-type motors are connected by a belt and pulley. Next, evaluate where the heating element, pump and pipe are located.
How to remove the main node?
Before removing the tank, you need to gradually remove most of the parts of the washing machine that are attached to its body. It is enough to strictly follow the analysis recommendations to achieve success.
To prevent the machine from accidentally receiving an electric shock, it should be de-energized before starting repairs. Simply remove the plug from the socket.
The first step is to disconnect the water supply pipes.
Then drain any water that may remain in the tank. To do this, the drain program is activated. Upon completion, you need to unscrew the filter with debris.
Check the drum again. There should be no foreign objects in it.
Turn the device so that there is nothing obstructing access to the rear panel.
Then remove the back panel and top of the car.
Remove counterweights. To do this, the retaining bolts are unscrewed.
The instrument panel and powder dispenser are detached.
The next step is to remove the pressure switch.
The hatch cuff and the device door are removed.
Access to the tank is open. Now, sequentially disconnect the wires, pipes and other elements that are connected to it and remove the engine. Then disconnect the dampers and springs. After all the parts have been dismantled, carefully take the drum from both sides, lift it and remove it from the machine. It is better to do this work together, the drum is heavy.
Disassembly nuances
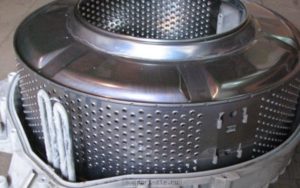
The dismantled tank must be placed on a flat surface, for example, on the floor. It is important that it is dry. Now you should disassemble the tank to clean the tank of soap and deposits.
The first step is to prepare a blade from a stationery knife and break it into pieces of one to three centimeters. The main thing is that the plates are thin.
It is better to carry out the work with gloves so as not to cut your hands.
Then take a thin flathead screwdriver and pry the seam latch.You need to carefully lift it and insert a piece of knife under it. Thus, you need to insert a piece of blade under each latch.
After this, you need to unscrew all the screws that are screwed into the tank.
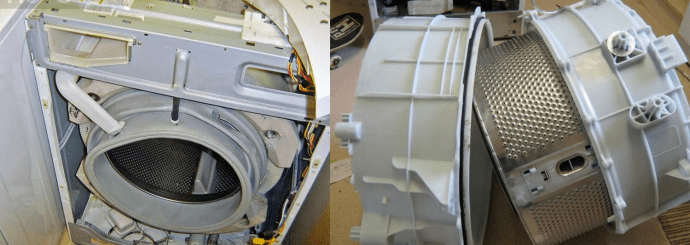
Insert a screwdriver along the contour of the seam and divide the tank in two.
Turn the container over and use a universal wrench to hook onto the shaft and unscrew the axle. If the shaft cannot be unscrewed, it is recommended to treat the joints with WD-40 cleaner and disconnect the tank half from the drum.
When contacting a service center, there is always the threat of running into unscrupulous specialists. They may not act carefully, not insert the blades between the latches, but break them off. This method significantly speeds up dismantling, but weakens the structure. Due to the fact that the plastic clamps are broken, the tank is held in place only by self-tapping screws. Technically, this assembly method is acceptable, but unreliable.
After the drum is completely disassembled, nothing prevents the unit from being repaired. Most often, bearings are replaced at this stage. To do this, the oil seal is dismantled, the cross is unscrewed and the ring joints are broken off. The space is cleaned with WD-40 and only after that new parts are installed. The joint is strengthened with silicone sealant, and the tank is assembled according to the same pattern, but in reverse order.
 If, when an Electrolux washing machine breaks down, you need to check the bearings and seals, you will have to almost completely disassemble the drum of the Electrolux washing machine. At first glance, it's simple. Difficulties arise when the master gets down to business: the heaviness of the parts, a large number of fasteners, lack of space for maneuvers. However, if you clearly know the assembly diagram of the structure and prepare the necessary tools, you can fix the breakdown at home.
 However, to disassemble some models, you may need other tools. We recommend that you have:
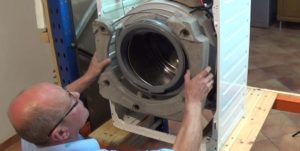


Thank you, you helped me understand the principle of operation. Everything was explained very clearly. Good luck to you!
Thank you for the accessible educational program. Good luck!