How to disassemble the drum in an LG washing machine?
As a rule, easy and quick dismantling of the washing machine stops at the approach to the tank. Here the situation is complicated by a motor fixed on the shaft, a bunch of fasteners and the need to act “from inside” the machine. But, despite the difficulties, anyone can disassemble the drum of a washing machine; you just need to keep in mind the appropriate instructions. It will be discussed below.
Let's assemble the tool
Washing machines from LG delight their owners not only with expanded functionality and stylish design, but also with the repairability of the equipment. The manufacturer has taken care of easy disassembly of the case, which requires a minimum of tools. You can handle the upcoming work with screwdrivers and pliers. But the process will go faster and easier if you additionally prepare:
round nose pliers;
wrench;
hammer;
awl;
universal wrench with socket heads.
To disassemble an LG machine, it is enough to have pliers and screwdrivers (slotted and Phillips) in your hands.
Once all the tools are collected, we move on to the washing machine. The design of most machines is almost identical. Only LG models with direct drive and belt drive differ. In the first case, the inverter motor is attached to the tank directly, and in the second - through a pulley and drive belt. Therefore, we open the factory instructions and look at the location of the system elements.
Progress
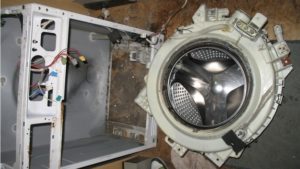
To get to the drum, we first disconnect the machine from the power supply, water supply and sewerage. We drain the residual liquid from the drain hose, and then remove the water through the garbage filter. Don’t forget to take the laundry out of the machine and move the equipment away from the wall, providing free access to the back panel. Then we successively remove the top and front covers, remove the counterweights, instrument panel, pressure switch, hatch door, cuff and other elements of the system until the tank appears before our eyes.
We find the drain pipe at the bottom of the tank, loosen its hold and remove it.
We unscrew the central bolt on the electric motor, fixing it in a stationary position, and remove the engine from the machine.
We twist the fastenings of the dampers, take them out, and then remove the tank from the suspension springs.
Having secured a pair of hands from a friend, we remove the tank from the washing machine.
Place the removed container on a flat surface.
Using a screwdriver, unscrew all the bolts on the body.
Life hack from repairmen: turn over the top cover of the washer and use it to store all small components (clamps, screws, nuts, terminals, connectors).
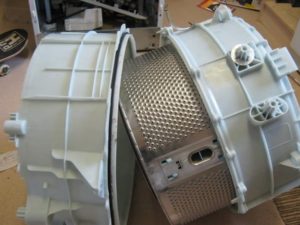
We divide the tank into two parts, moving the upper half to the side.
Turn the bottom part over with the cross facing up and treat it with WD-40.
After 40-60 minutes, knock out the drum by hitting the bushing with a hammer.
We pry off the oil seal with a negative screwdriver and remove it.
We install the bolt on the outer part of the opened bearing and knock it out by tapping it in a circle with a hammer.
With the removal of the inner bearing, disassembly of the drum is completed. All that remains is to thoroughly clean the surface of its walls, insert a new bearing assembly and a pair of seals. Next, we assemble the washer, following the instructions described, but in reverse order.
 As a rule, easy and quick dismantling of the washing machine stops at the approach to the tank. Here the situation is complicated by a motor fixed on the shaft, a bunch of fasteners and the need to act “from inside” the machine. But, despite the difficulties, anyone can disassemble the drum of a washing machine; you just need to keep in mind the appropriate instructions. It will be discussed below.


Add a comment