Disassembling the pressure switch of a washing machine
 Any automatic washing machine is equipped with a water level sensor - a relay monitors the degree of filling of the tank. If a problem occurs, you may need to disassemble the washing machine's pressure switch. We will tell you what parts the device consists of, how to properly open its case, and, if necessary, adjust the element.
Opening the relay housing
To check whether debris has entered the pressure switch or whether the contacts have shorted, it may be necessary to disassemble the water level sensor. You can open the device case yourself. The algorithm of actions will be as follows:
- turn off the power to the machine;
- remove the top housing cover;
- find the pressure switch;
- Unscrew the screw holding the sensor, disconnect the pipe and connector;
- remove the element from the housing.
Before disassembling the pressure switch housing, be sure to make marks on it with a marker. This is necessary in order to perfectly align the halves of the plastic “shell” in the future. To disassemble the pressure switch as carefully as possible, you will need:
- unnecessary plastic card;
- scissors;
- pliers,
- small thin screwdriver.
The algorithm of actions will be as follows: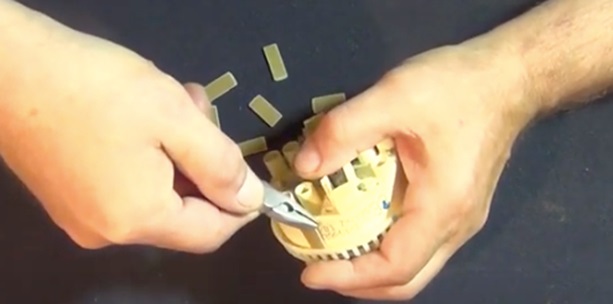
- cut the plastic card into pieces measuring 1x2 cm. In total, you will need about 8 of these “pieces”;
- alternately insert the plastic pieces between the two halves of the pressure switch using pliers;
- use a screwdriver to pry off the upper half of the “shell”.
By prying part of the body two or three times, you will see that the shell will easily “split in half.” This way you can quickly gain access to the insides of the pressure switch. Remove the membrane and check the sensor contacts.
Testing and setting up the sensor
Before you start repairing your “home assistant”, find the receipts and see if the washing machine is under warranty. If the deadline has not expired and you are entitled to free diagnostics, it is better to contact the service center specialists. It should be remembered that if you open the machine body yourself, you can’t hope for warranty service in the future.
If the warranty card is no longer valid, you can proceed with diagnostics. First you need to remove the sensor from the housing. The algorithm of actions will be as follows:
- de-energize the SMA by unplugging the power cord from the outlet;
- turn off the tap responsible for the water supply;
- Unscrew the two bolts securing the top panel of the machine;
- remove the “cover” of the unit;
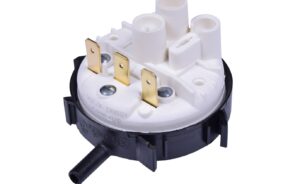
- find the pressure switch - it has the shape of a washer;
- Unscrew the bolt securing the relay in the housing, remove the connector;
- loosen the clamp and remove the sensor from the machine.
Before adjusting the device, you need to check whether it is working properly. For diagnostics, you will need a rubber tube of the same diameter as on the pressure switch. Having taken out the level sensor, put the prepared tube on its inlet fitting. Then blow into it - the working pressure switch will make 1-3 characteristic clicks. If the device is silent, it means that the contacts do not work and the relay is faulty.
Then inspect the level sensor. You need to make sure that it is not deformed and that there are no traces of burning on the surface. Also check the hose for blockages; sometimes the cavity becomes clogged with dust. If the tube is clogged, clear it or rinse it with warm water.
To more fully check the water level sensor, you will need a multimeter.
Hardware diagnostics of the pressure switch is more accurate.To test the device, set the device to resistance measurement mode and attach the multimeter probes to the pressure switch terminals. To activate the contacts, it is necessary to create pressure in the tube.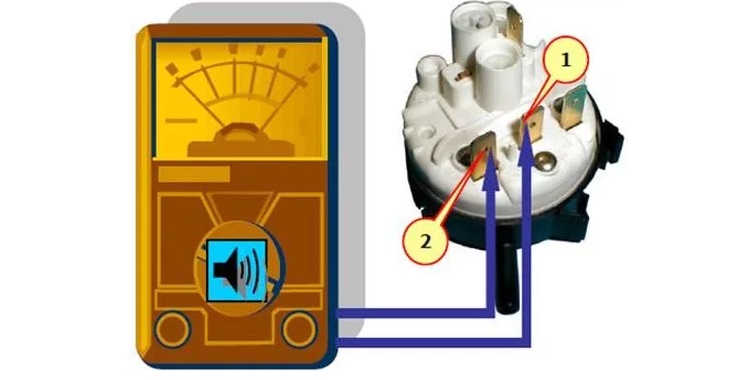
If the values on the multimeter display remain unchanged when the relay contacts are activated, you will have to replace the pressure switch. If the numbers on the screen change, we can talk about the serviceability of the sensor. Then, perhaps, it will be enough to simply adjust the existing device.
The level sensor is configured manually. Adjustment will be advisable in cases where too little or, on the contrary, too much water is poured into the tank during washing. The amount of liquid collected by the washing machine can be reduced or increased - to do this, you need to set the response force of the pressure switch.
First you need to turn off the power to the machine. Next, remove the top panel of the case, find the pressure switch and disconnect the connector. The relay has three adjusting screws, one of which needs to be tightened. The bolt with which adjustment is made is usually located in the central part.
It is necessary to adjust the pressure switch of the washing machine when the tank is empty.
To tighten the screw, you will need a Phillips screwdriver or a special wrench. The process is carried out in stages - it is necessary to evaluate the intermediate results of adjusting the pressure switch. So, you should turn the bolt half a turn, then assemble the machine body and start a test “idle” wash. If the desired effect is not achieved, you still need to turn the screw.
To set up a pressure switch, you need to have minimal basic knowledge of the internal structure of a washing machine.If you do not have even the slightest idea how a level sensor functions, it is better to invite a specialist to do the work. Otherwise, you can harm the “home assistant” even more.
Interesting:


Reader comments
- Share your opinion - leave a comment
Categories
Washing machine repair


For buyers


For users


Dishwasher


Add a comment