How to disassemble and clean a washing machine?
 Modern washing machines can do a lot automatically, but not a single appliance can clean itself. Meanwhile, hard water, low-quality detergents and dirty things leave their “mark” in the machine - soap scum, debris and dirt. If you do not remove all accumulated debris in a timely manner, the washing machine will become clogged and stop washing.
To return the equipment to cleanliness, you need to disassemble the washing machine for cleaning and rid it of debris and deposits. All that remains is to find out what to wash and in what order.
Where does most dirt collect?
The washing machine gets dirty everywhere, but the bulk of the scale and debris settles in certain places. To clean the washing machine, it is enough to identify the most littered areas and wash them consistently. We are talking about the following “sore points” of the machine.
- Garbage filter. This name is not accidental - it is on this nozzle that approximately 90% of the debris that gets into the washer settles. It needs to be cleaned first.
Almost 90% of the trash that gets into the washing machine settles on the garbage filter.
- Hatch cuff. Debris and foreign objects accumulate in the folds of the rubber seal. The situation is complicated by the fact that in addition to debris, water also gets into the rubber band, which, if dried for a long time, leads to the appearance of mold and mildew.
- Pump. More precisely, the impeller of the pump, on the blades of which hair, lint and wool “love” to wrap. Less often, the “wheel” is blocked by large debris that has leaked through the drainage filter.
- Tray for detergents. The powder remaining in the dispensary turns to stone and over time becomes covered with mold and limescale.If the hopper is not cleaned, the pipe will become clogged and will stop pouring soapy liquid into the tank.
- Bottom of the tank. Debris will inevitably accumulate at the bottom of the main tank. To clean it, you will have to partially disassemble the machine.
Having identified the places in the machine that are most vulnerable to debris, we begin a comprehensive cleaning. You can cope with the task yourself, but in some cases you will need the help of a spouse or friend. For “cleaning” you will need screwdrivers, a rag, water, soap and WD-40.
Cleaning out the trash can
The first thing you need to do is clean the garbage filter. Most often, the “trash bin” is located in the front lower right corner of the case. As a rule, the nozzle is hidden behind a decorative door of a rectangular or round shape. Getting to the drainage is not difficult, just follow the instructions:
- tilt the body of the machine back so that the front legs rise into the air by 5-7 cm;
- We place a small container under the technical hatch to collect water;
- use a screwdriver to pry up the hatch, unfasten the plastic latches and remove the door;
- inspect the filter, black or blue plug, and emergency drain hose, orange or red;
- pull the hose and drain the water into a substitute basin;
- if there is no drain hose, then unscrew the garbage filter counterclockwise to get rid of the water;
It is forbidden to empty the machine through the garbage filter immediately after the end of the high-temperature cycle - the water will not have time to cool down and will burn!
- unscrew the “trash can” all the way;
- assess the condition of the seat and the filter itself;
- We clean the nozzle from debris and scale.
A heavily soiled filter will have to be soaked in a warm lemon solution. The clean nozzle is screwed into place, and the machine returns to its original position.
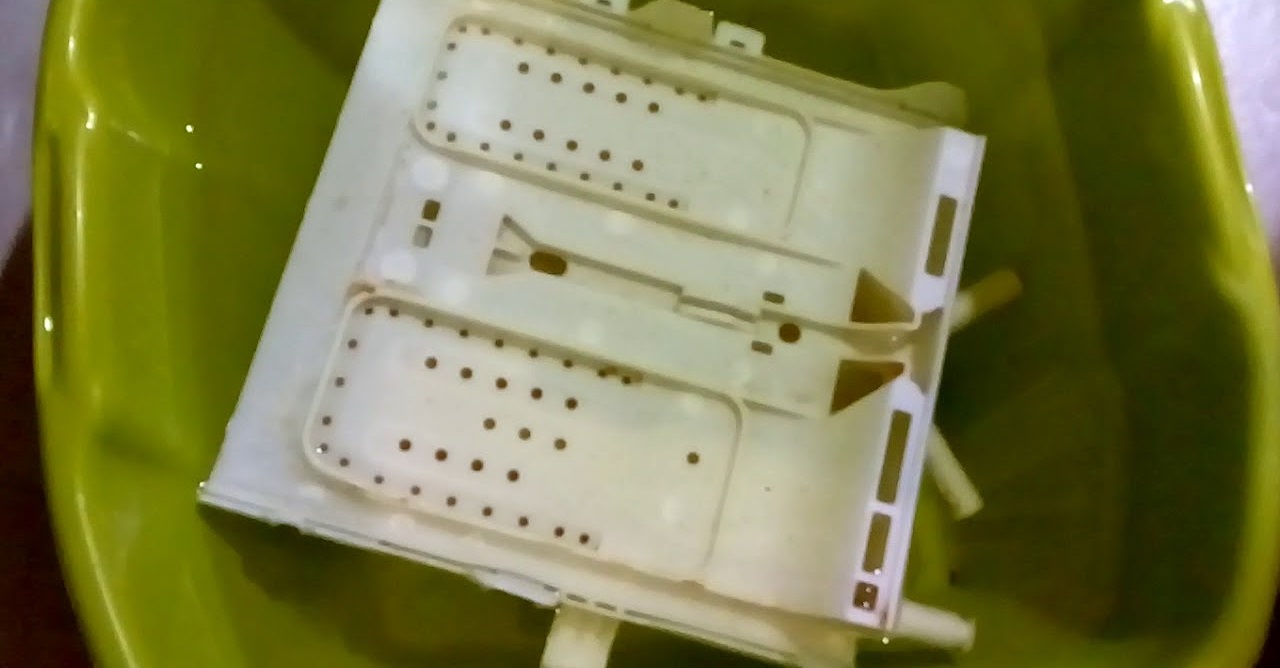
Powder receiver compartments
The powder receptacle is also easy to clean. But first you need to take it out of the case. We proceed like this:
- pull the tray towards you until it stops;
- Without releasing one hand, with the other we press the plastic tab, mostly blue, located in the central compartment for rinse aids;
- pull out the hopper to the end.
Before cleaning, the powder receptacle should be soaked in the cleaning solution for 1.5-2 hours.
By pulling out the tray, it is easier to assess the degree of contamination and begin cleaning. Simply rinsing will not wash away the hardened powder - you need to soak the plastic for a while. This method has worked well:
- fill the basin with water heated to a temperature of no more than 60 degrees (in boiling water, plastic is deformed and deteriorates);
- dissolve 200-250 g of citric acid or 100 ml of vinegar in water;
- lower the powder receiver into the solution so that the tray is completely covered with water;
- We wait at least 1.5 hours.
We remove the soaked powder receptacle from the solution and proceed to mechanical cleaning. The main task is to remove the remaining powder and debris using an old toothbrush or toothpicks. At the “finish” we wash the hopper and wipe it dry with a rag.
Cuff
The hatch cuff is vulnerable to debris and plaque. As a rule, washing particles, lint and dirt settle in the lower part of the seal between the folds. To remove accumulated debris, you need to open the drum, pull back the rubber band and thoroughly clean all hard-to-reach places. For these purposes, use a dish sponge or soft cloth.
Without timely cleaning, the hatch cuff becomes damaged by mold.
After the initial surface cleansing, we move on to the second stage: treatment with a cleaning agent.Apply white, vinegar or lemon solution to the sponge, and then go over the entire cuff. Then the door is closed for 30-40 minutes, during which the drug will complete the process: dissolve deposits and disinfect the gum from fungus. After half an hour, the drum is washed with clean water and wiped dry.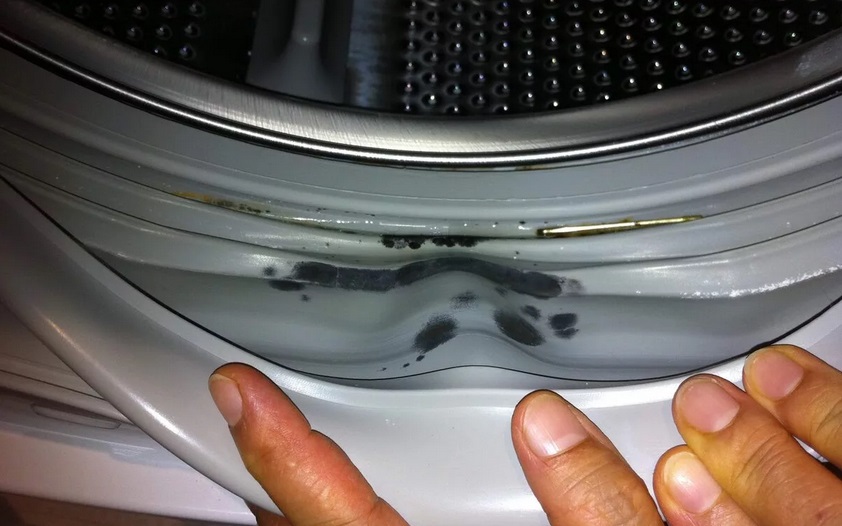
When cleaning the cuff, it is important to choose the right cleaning agent. The use of caustic and overly aggressive acids is prohibited: these compounds damage rubber.
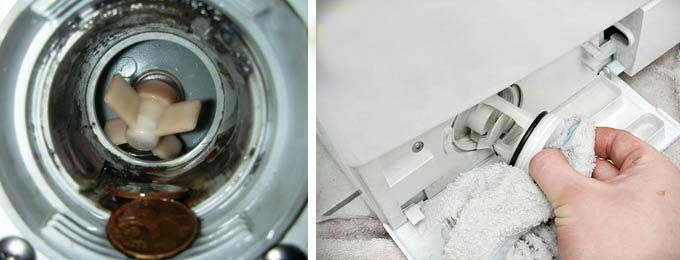
Cleaning the pump
A pump impeller that is blocked by hair or other debris is somewhat more difficult to clean. Here you will need the help of an outsider, since the pump will have to be removed and disassembled. To begin, disconnect the washing machine from communications and move it away from the wall, providing access to the rear wall. Then we attach the hoses to the body and begin cleaning:
- make sure that there is no water in the detergent tray;
- carefully turn the machine onto its right side;
- we look under the bottom of the washer and look for the pump - a round black part located on the volute and screwed with four bolts;
- photograph the location of screws and wires;
- release the pump by disconnecting the connected wiring and unscrewing the fasteners;
- swing the pump and remove it from the snail.
The pump impeller should rotate, but not freely, but with noticeable effort.
Next, we evaluate the condition of the impeller. When in good condition, the blades rotate with noticeable effort. If the wheel does not move at all, then it needs to be cleaned of threads, hair and lint. Free rotation is not normal: apparently, the part fell off or flew off the axis. There are two options - either tighten the fastening more tightly, or replace the pump with a new one.The main thing is not to try to “fix” the device with sealant or glue, since such a design is unreliable and unsafe.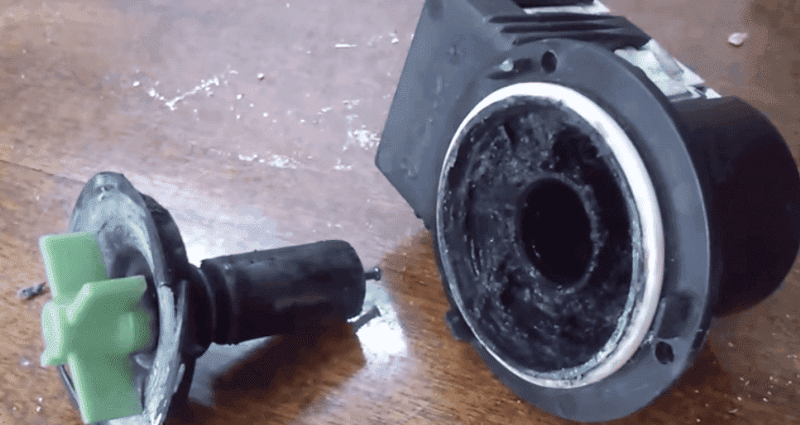
If everything is in order with the impeller, then we proceed to disassembling the pump. We unscrew the body, clean the two halves from dirt, and then assemble and test the blades again. Non-separable pumps cannot be halved for repair - only a full replacement of the spare part.
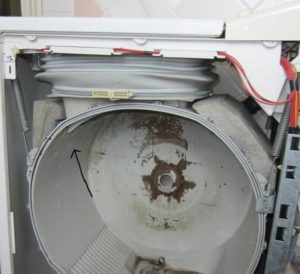
Let's get into the tank
The most difficult thing to clean is the washing tub. It’s better not to take it on without a reason or serious reason, as this will require disassembling the machine. Planned “cleaning” is not a valid reason. It’s another matter if a foreign object, a bra wire or keys are stuck under the drum - in this case there is a danger of damage to the metal and plastic tanks.
It is recommended to record all actions on camera to simplify the reassembly process and avoid errors when connecting wires.
You can get to the bottom of the tank through the hole for the heating element. The procedure is as follows:
- disconnect the washing machine from the power supply, water supply and sewerage;
- move the equipment away from the wall, freeing up space at the back wall;
- tilt the machine back, place a basin and drain the water from the tank through a garbage filter;
- remove the back panel by unscrewing the bolts holding it;
- find the heating element, located mainly under the drum, in the lower part of the housing;
- disconnect all connected wires from the heater chip, having previously recorded their location on the camera;
- remove the temperature sensor;
- unscrew the fastening nut and drop the axle inward;
- swing the heater and remove the heating element from the fastener.
Through the hole freed from the heating element, using a wire or a stuck hand, we clean the bottom of the tank from debris and foreign objects. Afterwards we return the heater to its place and assemble the washing machine.
Interesting:


Reader comments
- Share your opinion - leave a comment
Categories
Washing machine repair


For buyers


For users


Dishwasher


Add a comment