Adjusting the pressure switch of the Indesit washing machine
If your Indesit washing machine begins to draw too little water or, on the contrary, threatens to overfill the tank, then you need to pay attention to the pressure switch. It is likely that the level sensor has failed, become clogged, or its factory settings have been lost due to vibrations or voltage surges. In any case, it needs to be looked at, repaired and replaced. In order for the adjustment of the pressure switch of the Indesit washing machine to be successful, you must follow certain instructions.
Finding the part
The pressure switch consists of two parts: a plastic round “washer” and a long rubber tube. The first is located immediately under the top cover and is attached to the left side of the washing machine body, and the second is attached to the “washer” at one end, and to the tank fitting at the other. Thus, the pressure in the tank is measured and the level of collected water is recorded. To get to the sensor, you need to remove the top cover of the machine. To do this, we act like this.
From the back wall of the Indesit, use a Phillips screwdriver to unscrew the two bolts holding the top cover.
Lifting the cover from the back side, press on yourself until 2-3 clicks are heard from the latches being activated.
It is not recommended to pull the lid too hard, as the plastic latches can easily break.
If the lid does not budge, you can increase the pressure and change the side to put pressure on the panel.
As soon as the cover moves, remove it and examine the internal parts of the machine. Typically, the level sensor washer has a white, black or blue body color. The pressure switch and the tube that goes deep into the machine “gives out”.
How to understand that the pressure switch is broken?
Before attempting to repair and adjust the level sensor, you should ensure that it is faulty. This is not difficult if you take a closer look at the behavior of the washing machine. For example, you should be alert to an uncharacteristic hum when drawing water, a cycle that does not start, or an incessant drain.
The display will tell you directly about problems with the pressure switch. If the “F05” combination lights up on the machine, then with a 70% probability it is the level sensor that refuses to work. The risk increases to 85% when the user notices that there is either too little or too much water in the drum.
It is strongly not recommended to neglect a broken pressure switch. Operating a machine with a faulty sensor can greatly aggravate the problem. If there is not enough water in the tank, the heating element will burn out, and if it overflows, the pump, which cannot cope with the volume, will suffer. It’s even worse if the triac on the control board fails, since the cost of repairs will increase by 2-3 times.
What do we check first?
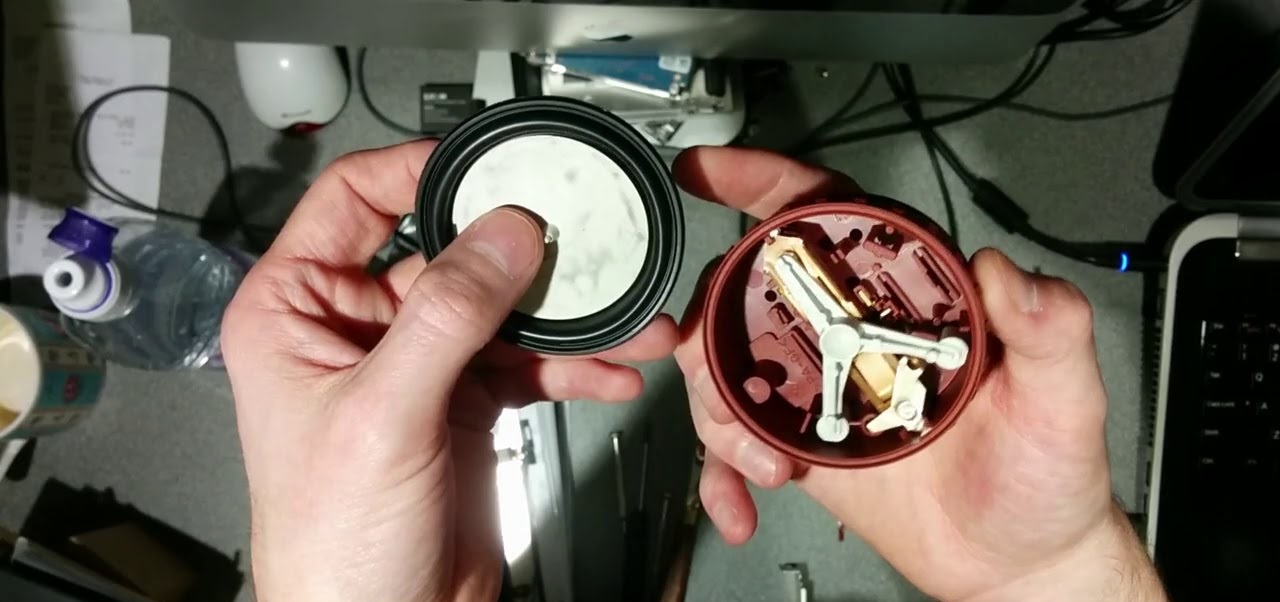
Once you have confirmed that the pressure switch is faulty, you need to start diagnosing it. First of all, the water intake system is checked: the hose, the fitting and the “chamber” of the device itself. If there are no cracks, abrasions or chips, then the parts are in order. If deposits from washing powder are detected, the sensor is disassembled and all components are washed. When damage is noticeable on the tube or “washer”, repair will not help - only a full replacement.
The second step is to check the quality of the connection to the electrical network. It is likely that the wiring has worn out or bent, a contact has come loose, or a terminal has become loose. It is definitely worth inspecting the contact group of the sensor, since plaque and dirt present inside the part can cause noticeable failures. Finally, the pressure switch needs to be tested.We act this way.
We find a tube that matches the diameter of the pressure switch fitting.
We insert one end of the found tube into the sensor hose.
We blow lightly at the other end.
We listen: if 1-3 clicks are heard, then the sensor is in order.
If the pressure switch is intact and clicks properly, but the machine still does not wash, you will have to move on to setting up the sensor. It is not necessary to call repairmen - almost every washing machine user can cope with the adjustment. Instructions and recommendations are given below.
Part setup
Adjusting the pressure switch is not a difficult task, but it is painstaking and slow. The main thing is to act extremely carefully, do not rush and do not deviate from the instructions. It is also important to thoroughly prepare for setup, for which you need to perform a number of steps.
Disconnect the machine from communications, electricity and water supply.
Before disconnecting the pressure switch wiring, it is recommended to record the location of the conductors on a camera so that when reconnecting you do not make a mistake with the phase.
Loosen the bolts and release the wiring connected to the sensor.
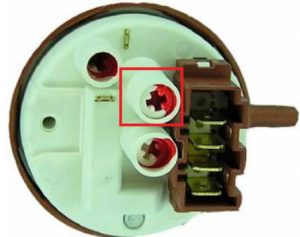
Find the screws next to the terminals, with the help of which the contacts of the device are attracted and loosened.
Remove sealant from screws.
The previously mentioned screws are what we have to work with. The main task is to catch the moment of contacts approaching and opening. Then optimal operating parameters will be created, and the pressure switch will operate at the right moment and accurately measure the water level in the tank. Professional repairmen use a special device for these purposes, but, as a rule, ordinary users do not have such a mechanism. However, you can cope with the well-known “poke method”. We act according to the following plan.
Carefully turn the first screw half a turn in any direction.
We return the pressure switch to its place and start the washing machine at the fastest mode.
We evaluate the quality of the set. If earlier there was little water, but now there is more, then the progress is positive. In this case, we complete the cycle, remove the sensor, turn the screw again in the given direction and fill it with sealant. When manipulations produce the opposite result, for example, there is even less water, then we act in the opposite way. Unscrew the bolt 1-2 turns in the opposite direction and repeat the test.
In most cases, correct adjustment of the pressure switch saves the situation, and the washing machine continues to operate without problems with loading and draining. The main thing is not to “pinch” the screws and don’t be too lazy to restart the machine several times for the best result.
Setting doesn't help
If external damage is found on the pressure switch or the adjustment fails to help, then replacement is necessary. Fortunately, this is done quickly, and the part itself is relatively cheap. You just need to purchase a sensor that matches the serial number, remove the old one and install the new one.
Before connecting a new pressure switch, it is recommended to carefully study the electrical wiring diagram of the washing machine.
First, a new sensor is attached to the seat.
Next, connect the hose to the part and secure it with a clamp.
We connect the wiring, focusing on the electrical diagram.
At the “finish” we start a test wash. If the error situation repeats, then the problem is different, and it is better to contact the service center for a comprehensive diagnosis.
Everything is simpler.
If everything is fine and you only need adjustment, take a bucket of water and pour it into the machine. And adjust the screw until it operates and there is no need to turn the machine on and off. Then you start the drain and that’s it
 If your Indesit washing machine begins to draw too little water or, on the contrary, threatens to overfill the tank, then you need to pay attention to the pressure switch. It is likely that the level sensor has failed, become clogged, or its factory settings have been lost due to vibrations or voltage surges. In any case, it needs to be looked at, repaired and replaced. In order for the adjustment of the pressure switch of the Indesit washing machine to be successful, you must follow certain instructions.
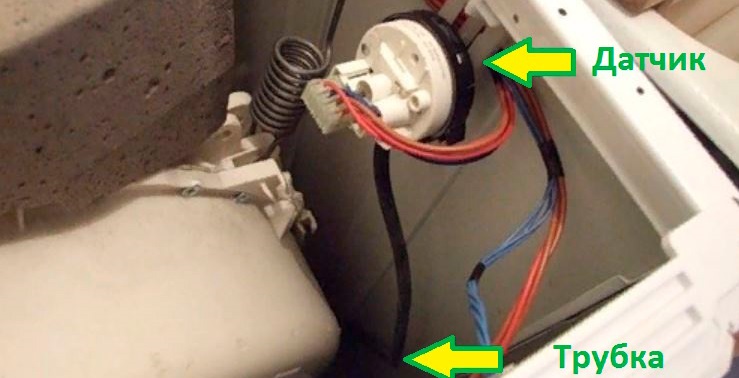


And where is it, this “first” cog? No diagram, no drawing.
Everything is simpler.
If everything is fine and you only need adjustment, take a bucket of water and pour it into the machine. And adjust the screw until it operates and there is no need to turn the machine on and off. Then you start the drain and that’s it