Bosch washing machine motor repair
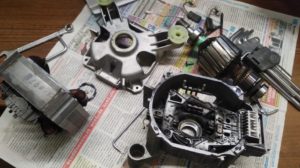 Self-repair of the Bosch washing machine engine is not possible in case of all breakdowns. Even a novice master can replace worn out electric brushes, but grinding off the lamellas or adjusting the winding is not possible - this is much more difficult and risky. In any case, you first need to diagnose the motor and clarify the problem. There are several ways to check the engine's performance. We suggest considering all diagnostic options, as well as troubleshooting instructions.
Verification options
Almost all Bosch washing machines are equipped with commutator-type motors that spin the drum through a belt drive. The advantage of these motors is that they can be tested at home.. The main thing is to study the electrical circuit diagram of the engine and remember the safety rules. The connection in most commutator motors is organized according to the following scheme:
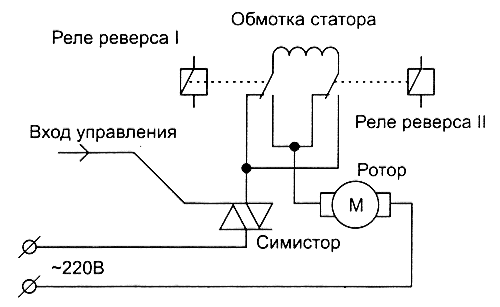
So, a certain sequence is observed. The 220 Volts supplied to the motor are first supplied to the control triac, after which the current goes to the reverse relay contacts (II or I), then to the stator winding and rotor. The signal to switch modes and vary power is supplied by the control board through a transformer and contact groups of the command device. The tachogenerator located on the housing regulates the acceleration speed of the engine, and the outgoing friction force of the electric brush smoothes out.
Bosch washing machines are equipped with commutator motors, which require a belt drive.
The stator winding has two sections, which reduces the likelihood of interference that may occur due to sparks on the commutator.By changing the polarity on the wire, the side of rotation of the drum is changed. When switching to spinning, the provided outlet is activated. In this case, electricity is connected to one of the outer terminals and the outlet itself. If the latter is lowered, it means that the washer operates only in the standard mode, while the shaft movement is slow and smooth.
To test a commutator motor with your own hands, you need to supply electricity directly to the device. The discharge occurs when connected to the stator and rotor windings in series. A working motor will hum and start working; when it closes, heating of the circuit will be noticed. Schematically this connection looks like this:
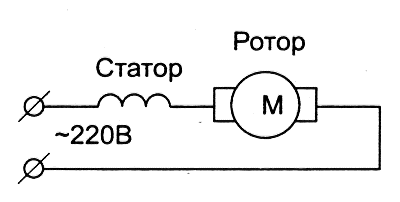
There is another option for diagnosing the engine. We connect the stator and rotor windings in the manner described above, but as a power source we use a special autotransformer with a power of more than 500 Watts. This path is considered safer, as it allows you to better control the acceleration of the motor and respond in a timely manner to unforeseen situations. Ideally, you should play it safe and include a 5 or 10 Amp fuse in the circuit.
In the absence of a transformer, an electronic regulator is used. With its help, it is easier to control the power of the given load, preventing the motor from overheating. It’s interesting that you can make such a device yourself: you just need to find the appropriate diagram on the Internet.
It is easier for beginners to test the motor visually. For example, after starting the engine, evaluate how much the commutator brushes spark. If there are a lot of sparks, it means that there is a failure in the system - it is necessary to disassemble the engine and carry out advanced diagnostics.
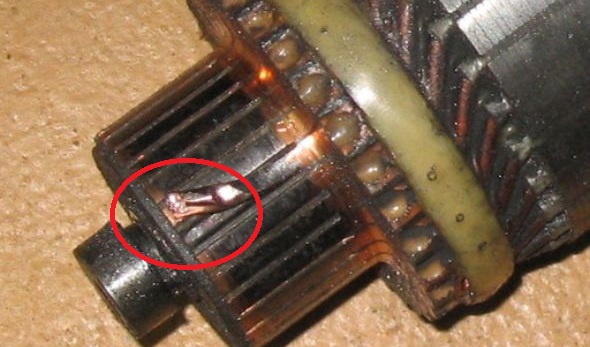
Detachment of lamellas
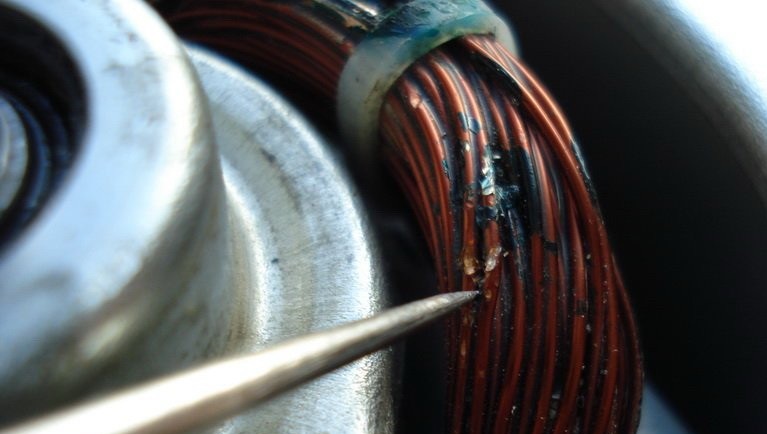
Often the motor does not work due to lost contact with the rotor winding section. This happens if the motor slats or the wire next to them is not in order. The current supplied to the motor does not reach the rotor at all or its strength is significantly higher than the rated level. In any case, there is a risk of short circuit or overheating.
Lamels are metal plates that are glued to the commutator shaft and help transmit current through the circuit. When electrically connected to winding sections, special hooks are created that are necessary for better contact. However, during operation of the motor, the wires often cling to protruding elements and break off. When repairing, it is necessary to restore the integrity of the device.
Operating an engine with peeled lamellas is dangerous - a short circuit with all the consequences is possible.
It is more difficult if the lamellas peel off. The cause of such a breakdown is excessive heating resulting from a short circuit or rotor jamming. A current passes through the plates that exceeds the operating level, which leads to overheating and detachment of thin metal. As practice shows, more often discharge occurs due to:
- faulty bearings that abruptly “stop” the motor;
- neglected washing with unfixed drum flaps in a vertical washer, which leads to a sudden stop of the system.
The slats do not peel off without reason. Moreover, their departure clearly indicates concomitant engine breakdowns or improper operation of the machine. It is necessary not only to fix the problem itself, but also to “work on the errors”.
If the lamellas have peeled off slightly, by 0.5 mm or less, then engine repair will be limited to grooving the shaft on a special machine.You will have to identify all the waste, clean them, and then carefully inspect the treated areas, removing dust and burrs.
Detachment of the lamellas can be confirmed with a manual test. It is enough to slowly rotate the rotor with your palm and listen: if you hear a characteristic crackling sound, it means that the plates are clinging to the winding.
Changing brushes with your own hands
If the engine stops working due to worn out electric brushes, then solving the problem is simple - dismantle the old ones and install new ones. The first step is to take care of the replacement and purchase similar spare parts. The selection of components is carried out according to the serial number of the washing machine or motor. The ideal solution is to remove the damaged brushes and bring them to the store.
You can’t choose electric brushes at random. Even Bosch washing machines use different types of parts: with and without housing, with central and corner contacts. In order not to make a mistake, it is important to carefully examine the assortment and tell the seller the brand and serial number of the machine. Especially if the analogue is ordered from an online store.
The brushes are installed directly on the engine. To replace them, you must first remove the motor from the machine. We proceed like this:
- move the back panel away from the body by unscrewing all the provided bolts;
- we find the engine located under the drum;
- we remove the drive belt by pulling it towards ourselves while simultaneously turning the pulley;
- release the wiring from the motor contacts;
- loosen the bolts holding the motor (an 8 mm wrench will do);
- we pull the engine out of its seat, swinging its body to the sides.
It is recommended to record all manipulations on a photo or video camera to avoid errors during reassembly.
We place the engine removed from the washing machine on a flat, dry surface and continue the repair. You need to find two electric brushes attached to the sides of the case, remove them and inspect them. The sequence is:
- disconnect the wire connected to the electric brush case;
- move the contact down;
- stretch the spring;
- pull out the brush.
The brush case is then opened and the carbon tip inside is measured. If the length of the “coal” is less than 0.7 cm, then replacement is necessary. We install the new rod in the socket, compress the spring, fix it in the seat, move the contact up and connect the wiring.
The second brush is dismantled and installed according to similar instructions. It does not matter whether it is erased - the carbon rods are always replaced in pairs. Then we return the motor to its place and assemble the washer, proceeding in the reverse order:
- insert the engine into the “socket” and fix it with fasteners;
- connect the wiring;
- we tighten the drive belt, first putting it on the pulley, and then, turning it, on the large wheel;
- We assemble the case by screwing the back panel.
All that remains is to check the new electric brushes. We turn on the quick wash and evaluate the operation of the motor. If the engine starts and rotates the drum as before, then everything is done correctly.
The windings are broken or shorted
Acceleration problems also arise when the winding is damaged: the motor does not start or the drum rotates very weakly. The fact is that short circuits occur in the wire turns, the engine begins to overheat, the thermistor is triggered, and the system urgently turns off the power for safety reasons. At the next start, the situation repeats until the temperature sensor burns out, and then the engine itself fails.
The winding is checked with a multimeter according to the following algorithm:
- turn on the tester in the “Ohmmeter” mode;
- we attach the probes to the adjacent lamellas;
- We evaluate the resistance (the norm is from 0.1 to 0.4 Ohms).
Repairing the winding yourself is very dangerous. It is better to turn to professionals or purchase a new engine.
Interesting:


Reader comments
- Share your opinion - leave a comment
Categories
Washing machine repair


For buyers


For users


Dishwasher


Add a comment