Whirlpool washing machine does not fill with water
 What to do in a situation where the automatic machine does not draw water? What could be the reasons for the malfunction? Which components and parts of the Whirlpool washing machine should I check first? Let's try to figure it out.
Let's determine the range of possible faults
There are several reasons why an automatic machine does not fill with water. Such a breakdown can be caused by either a normal corrugation blockage or damage to the control board. But some problems with Whirlpool washing machines are more common than others. If you find that the tank is not filling, you will have to check the following elements:
- inlet valve. In most cases, you can confirm your guess by opening the powder receptacle. When you see unwashed, dry granules in the container, you should begin diagnosing the water intake valve. To do this, you need to supply 220 Volts to it. If there is a characteristic click, the element is working. Otherwise it will need to be replaced. It’s easy to install a new part with your own hands, without resorting to the help of a specialist;
- input filter. The main “symptom” indicating a clogged mesh is excessive whirring of the Whirlpool washing machine when trying to draw water. When the filter element is clogged, liquid does not enter the system. Cleaning the filter will help;
- level sensor. If the pressure switch is not functioning correctly, it can send a signal to the main control module that the tank is sufficiently full when the tank is empty. The “brain” blocks the water supply, therefore the wash does not start. Carrying out diagnostics is very simple - you need to remove the top cover of the Whirlpool washing machine, find the element (it is a plastic “washer” with a pipe going down). To check the level sensor, you should disconnect the tube from it and blow into it. A working pressure switch will “click” several times. It happens that the hose becomes clogged, and such “blowing out” helps restore the operation of the part;
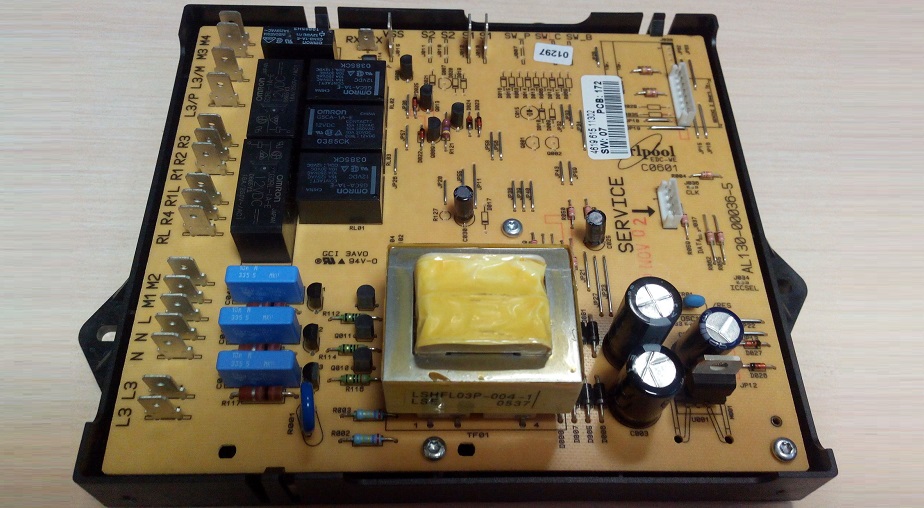
- electronic module. Rarely, the cause of the problem may be a damaged control board. Due to burnt-out resistors or tracks, the “brain” incorrectly interprets the received signals and issues incorrect commands. This leads to the automatic machine “freezing” even at the stage of drawing water. To repair the main unit, you need special knowledge and tools, so it is better to invite a professional;
- pump. A burnt-out pump cannot transmit a signal to the “brain” at the very beginning of the wash that it is ready to drain liquid from the system. Therefore, the electronic module “slows down” the wash, preventing the cycle from starting. It will be necessary to diagnose the element, and if a breakdown is detected, replace the unit;
- heating element. A damaged heater may be preventing the wash from starting. You'll have to check the tubular element.
In most cases, an automatic machine does not draw water precisely because of a faulty inlet valve or a failed level sensor.
A little less often, the reason lies in a clogged mesh filter or a burnt-out pump. There are rare cases where it is impossible to fill the tank with water due to damage to the control board. When carrying out diagnostics, be sure to also inspect the pipe connecting the tank and the pressure switch. If there are defects on the tube, it is possible that they are interfering with the operation of the level sensor.
Sometimes the reason is a breakdown of the UBL. When the hatch door is not locked, the Whirlpool washing machine does not begin drawing water. The blocker is checked with a multimeter. If you discover damage to the locking mechanism, be sure to replace the element.
Public diagnostics
If you notice that after starting the cycle, the automatic machine still does not start drawing water, there is no need to panic. You should analyze the situation and understand what to do first. If your Whirlpool washing machine is under warranty, you should not open the case and repair the unit yourself - it is better to contact a specialist. The service center technicians will diagnose the equipment free of charge and carry out the necessary repairs.
If you disassemble the machine yourself, the warranty will no longer apply, and you won’t have any hope for free consultation and repairs.
First, make sure there is a water supply in the house. Perhaps the utility company temporarily turned off the service, and it’s not the machine at all. Also check that the shut-off valve is not closed. And finally, check that the UBL has worked and the machine hatch door has closed properly.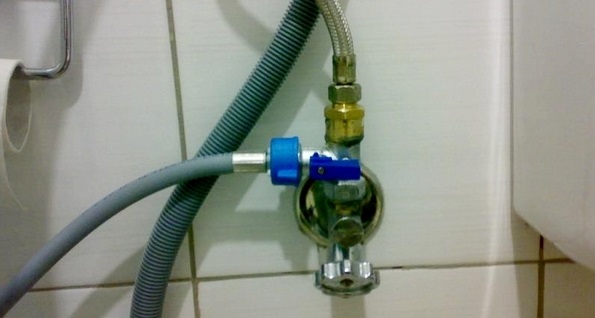
If everything is in order and the washing machine does not fill with water, you need to proceed further. The reasons should be eliminated one by one, from simple to more complex. Before starting diagnostics, be sure to turn off the power to the automatic machine and turn off the shut-off valve.
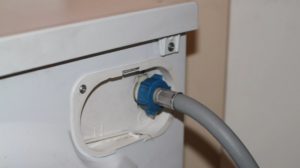
The first thing to check is the inlet hose. You should disconnect it from the washing machine and water supply, inspect for damage to the surface, and rinse under pressure. Afterwards, you need to make sure that the inlet filter is not clogged with debris.
To check the mesh filter:
- disconnect the inlet hose from the unit;
- inspect the inlet solenoid valve, find the mesh;
- use pliers to remove the filter (grasping the small protrusion);
- clean the mesh with a toothbrush and needle, rinse in warm water;
- put the filter element back.
It would be useful to inspect another filter - deep cleaning. It is installed directly after the stopcock.The mesh suffers from scale – since most of the impurities settle on it. To remove the filter element, two wrenches are required. One needs to hold the joint, the other needs to twist the fastening nut. The removed filter should be cleaned with a brush and rinsed under high pressure. Having completed the procedures, you need to check whether they helped restore the operation of the Whirlpool washing machine.
Is it really the inlet valve and heating element?
The most common reason for the inability to draw water is a malfunction of the inlet valves. They cannot be repaired; damaged parts must be replaced. Having identified that there is a problem with the solenoid valves, you must proceed as follows:
- unhook the inlet hose from the washing machine, drain the water from the corrugation;
- remove the housing cover by unscrewing a pair of bolts securing the “top”;
- take a photo of how the contacts are located on the coil;
- disconnect the wiring from the sensor;
- Use pliers to unhook the hoses from the terminals. Proceed carefully, as there is always water in the tubes;
- unscrew the screw that holds the valve;
- remove the inlet element;

- install a new valve, secure with a screw;
- restore the initial position of the hoses;
- connect all wires to the contacts;
- make sure that the components are securely fastened in place;
- reinstall the top panel of the case, secure it with self-tapping screws;
- insert the inlet hose into place.
After completing the replacement, you need to check the Whirlpool washing machine. Connect the machine to the network, open the shut-off valve and run a test cycle with an empty drum.
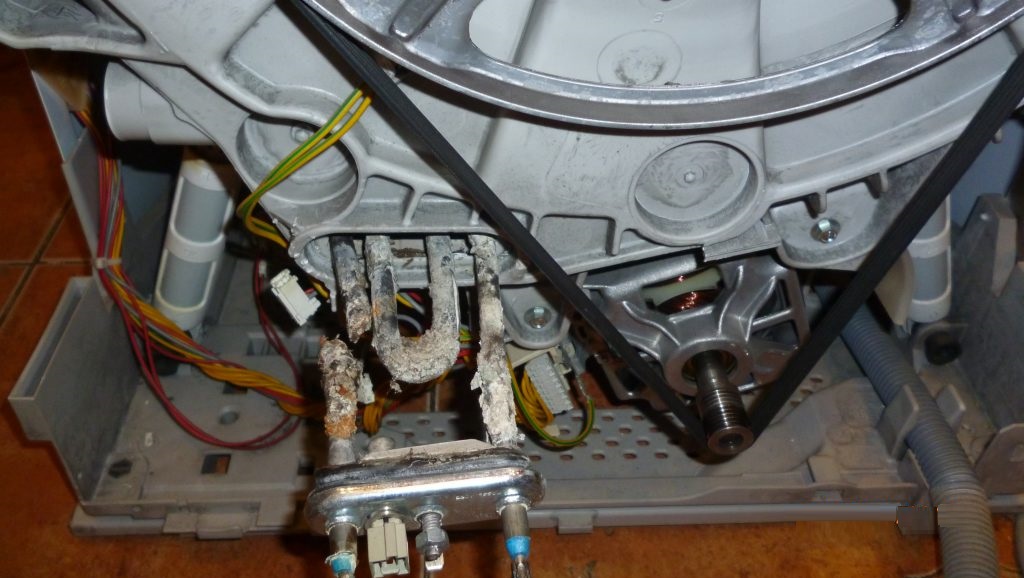
When the problem is not clogged hoses, filters, the pressure switch and inlet valve or the hatch blocking device, you need to check the heating element. For diagnostics you will need a multimeter. A heating element affected by scale may cause problems with the normal functioning of the washing machine. Whirlpool.
What to do in this case? The algorithm for replacing the heater is as follows:
- remove the “top” of the housing. To do this, unscrew a couple of bolts behind and remove the cover;
- Unscrew the screws securing the back panel. Remove the back wall of the machine;
- find the heater - it is located under the tank;
- using pliers, disconnect the temperature sensor contacts and the ground wire from the heating element;
It is advisable to take a photograph of the wiring diagram so as not to make mistakes during reassembly.
- loosen the central nut;
- grab the tubular heater and, shaking it slightly, remove it from the “socket” along with the rubber gasket;
- lubricate the rubber band with liquid detergent and put the seal back into the recess;
- insert the new heating element into the “socket”;
- connect all wires, grounding, thermostat;
- assemble the body.
If all the work carried out is unsuccessful, the cause may be damage to the control board. To diagnose the module, you must invite a specialist. It is better not to start repairing the main electronic module yourself without sufficient experience and skills. Otherwise, you can damage the washer even more.
Interesting:


1 reader comment
Add a comment
Categories
Washing machine repair


For buyers


For users


Dishwasher


It didn’t start for me, I went through everything according to the inventory. It turned out that the brushes on the motor were worn out.