If the washing machine has stopped heating the water and displays an error code associated with the heating element, it means that the heater is broken. The system will continue to run high-temperature cycles, but there will be little use - the degrees will remain at a minimum. “Idle operation” of the device will eventually affect the control board, which will begin to freeze and become confused. It is dangerous to operate a washing machine with a faulty heater - you need to replace it with a new one as soon as possible. Let's look at how to dismantle and install the heating element in a washing machine.
Changing the part
Before installing the heating element, it is necessary to dismantle the old one. More often, the heating element is located under the washing tub on the back side of the machine, but on some models of washing machines, access to the element is possible only from the front. The location of the device does not affect the replacement procedure, since the basic algorithm remains unchanged. To get to the heating element, you need to go through several stages of disassembling the machine.
Disconnection from communications. First of all, the washing machine is “cut off” from the power supply, sewerage and water supply.
Emptying the tank. It is necessary to pry off the technical hatch door with a screwdriver, place a container, unscrew the garbage filter and drain the water from the drum. As soon as the stream weakens, we tilt the machine body forward - this way you can drain all the liquid remaining in the machine.
Removing the panel. If the heating element is located on the front side, then the front wall of the housing is removed, if on the reverse side, the rear wall is removed. As a rule, it is enough to unscrew a few bolts around the perimeter of the shield and unhook it from the machine.
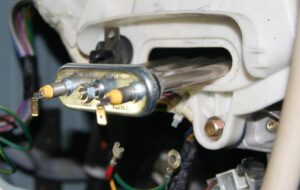
Search for heating element. It is located under the washing tub.The user can see his “trick” - a round plate with connected wires. There are three terminals: phase, neutral and ground. A temperature sensor is also connected to the heater.
Disconnecting wiring. We release the phase and neutral terminals, loosen the grounding nut and unhook the other contacts.
Take a photo of the wiring before disconnecting - this will help you connect the terminals correctly when reassembling!
Checking for serviceability. It is recommended to verify that the heating element is broken before dismantling. Step-by-step instructions are provided in the next section.
If the heater is operational, then disassembling the washing machine will not eliminate the problem - the cause of the failure lies elsewhere. You can try to test electronics, but only if you have the appropriate knowledge, experience and equipment. It’s better not to risk it and contact a service center for a full diagnosis. It is worth understanding that the cost of a new control module often reaches 50-60% of the price of the machine. At the same time, the board remains extremely vulnerable to external influences - one careless movement will lead to the “death” of the part without the possibility of recovery. Is the heating element broken? Then we continue dismantling.
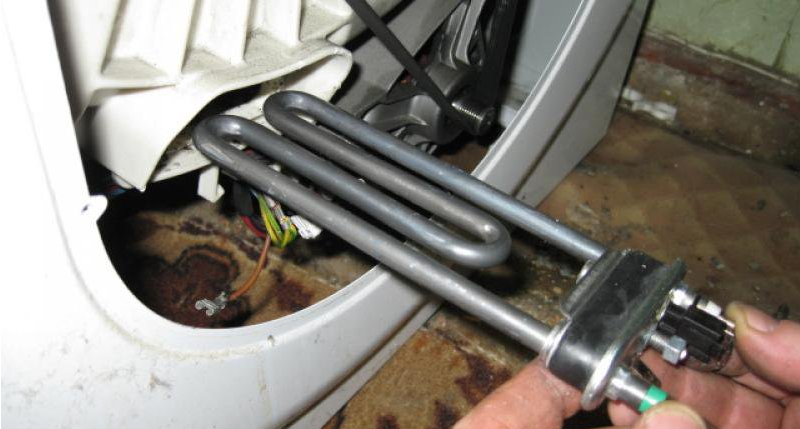
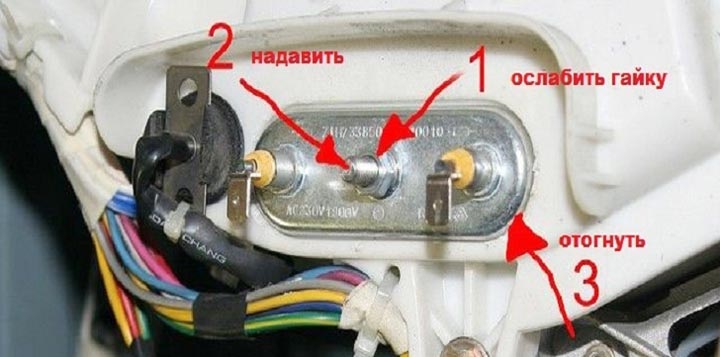
Loosening the center nut. Loosen the grounding screw, but not all the way - to the length of the thread. Afterwards, the nut must be recessed in order to “move” the rubber seal. The lining is responsible for the tightness of the heater and is pressed against the spiral when the fastener is tightened.
Dismantling the heating element. The heater body is carefully pryed up with a screwdriver around the entire perimeter and disconnected from the seal. If the rubber band has stuck to the part, then you should not use force - it is better to treat the cuff with WD-40 and wait 15-20 minutes. Afterwards the element will calmly leave the seat.
The next step is purchasing a new heating element. Experts recommend taking an old heater with you to the store and presenting it to the sellers as a sample. Then the probability of error will be extremely small. By the way, choosing a replacement can be quite problematic: manufacturers produce many models that differ in size, design and shape. It’s better to play it safe and focus on a specific example.
When choosing a new heating element, you need to focus on the power, shape and size of the heater, as well as the serial number of the washing machine.
Having selected a new heating element, you can begin installing and connecting it:
clean the seat and seal from scale;
loosen the central nut;
fix the heating element in the grooves;
tighten the bolt;
connect the wiring (to connect correctly, we focus on the photos taken earlier).
Upon completion of the replacement, the washing machine is assembled and connected to communications, and after that, any high-temperature mode is started. You should wait 10-15 minutes, interrupt the program and check the functionality of the heating element. If the heater is warm and there are no leaks around it, then the repair was carried out correctly.
Check the old part
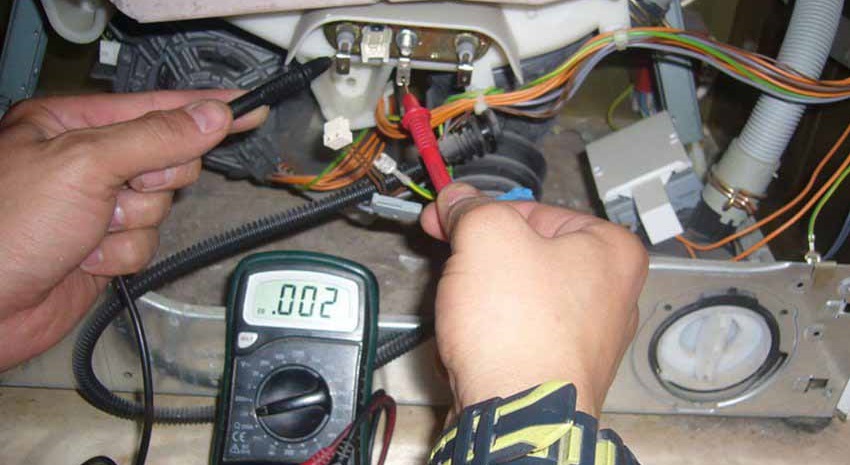
A new heating element is not cheap, so before replacing it is necessary to make sure that the old one is faulty. For diagnostics, it is not necessary to remove the device from the case - you can evaluate the performance of the element on site. The main thing is to prepare a multimeter or other device capable of measuring resistance and current.
To make sure that the heating element is working properly, you need to check it three times. The first step is to break the nichrome bond. More often, heating becomes unusable for this reason, since the spiral burns out and the current stops “circulating” through the part. The guess is confirmed by a “dialing”:
turn on the multimeter in the “Resistance” mode;
attach the tester probes to the terminals of the heating element;
We look at the scoreboard: if the arrow stops at “0”, the spiral has burned out.
Before using the multimeter, make sure it is working properly!
The second step is to check the heating element for breakdown, especially if there is no grounding in the living space. A “broken” heater is very dangerous - current leaks, the body of the machine becomes energized, which can lead to an electric shock. More often, the washer “beats” slightly, but more disastrous outcomes are possible. Diagnostics in this case proceeds as follows:
one probe of the multimeter clings to the terminal of the heating element, the second to the metal spiral;
the value is set to “200 Ohm”;
the result is evaluated on the scoreboard (normally, the arrow should stop at “0”; in case of deviations, replacement);
the machine connects to the network for a few seconds;
the check is repeated (sometimes the breakdown is detected only after heating the heating element).
The third stage is checking the power. This is not necessary, but it is indicative: in this way the degree of wear of the part is assessed. First, we calculate the current strength for a specific heater by dividing the rated power by the network voltage. So, for a 1900 W heating element and a 220V line, a minimum of 8 A is required. Having calculated the norm, we turn the multimeter into ammeter mode and take measurements. If the arrow points to the resulting number, then the device is in order; if the deviation is too large, critical wear has been detected. In the latter case, the heater will not last long; it is better to replace it as soon as possible.
Why does the heating element break?
The heating element is considered one of the most vulnerable parts of a washing machine. Sometimes it can last 10-15 years without accidents, and often fails in the first year.There are many reasons for early breakdown: from manufacturing defects to violation of the operating conditions of the washing machine. Let's look at each malfunction in more detail.
Manufacturing defects. This includes the use of low-quality spare parts by the manufacturer. Typically, heating elements are not manufactured together with machines, but are purchased separately from suppliers. While some companies carefully control third-party parts, others often choose cheaper options.
Voltage surges. The electricity supplied to the apartment is not always stable: problems at stations or weather conditions lead to a sharp drop and increase in current strength. As a result, the heating element, the wires connected to it, or part of the control board burn out.
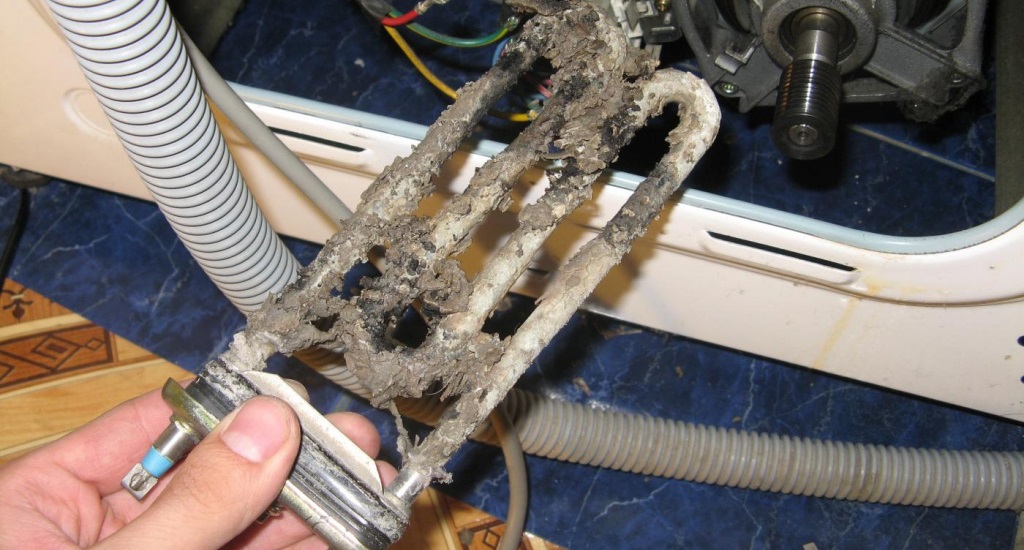
The water is too hard. Often tap water in city apartments has a high concentration of calcium. At high temperatures it hardens, settling on the heater body - scale appears. Lime deposits impair heat transfer, reduce the efficiency of the device and provoke overheating of the nichrome spiral. As a result, the heating element cannot stand it and burns out.
You cannot run more than two high-temperature cycles in a row - the heating element may overheat and fail!
Heating element overload. Running several high-temperature cycles in a row also leads to overheating. It is recommended to let the machine rest for 15-30 minutes after every two “hot” programs.
If the old heating element is broken, then it is necessary to install a new one as soon as possible. Otherwise, not only the quality of the wash will suffer, but also the equipment itself - the control board will freeze and fail.
 If the washing machine has stopped heating the water and displays an error code associated with the heating element, it means that the heater is broken. The system will continue to run high-temperature cycles, but there will be little use - the degrees will remain at a minimum. “Idle operation” of the device will eventually affect the control board, which will begin to freeze and become confused. It is dangerous to operate a washing machine with a faulty heater - you need to replace it with a new one as soon as possible. Let's look at how to dismantle and install the heating element in a washing machine.
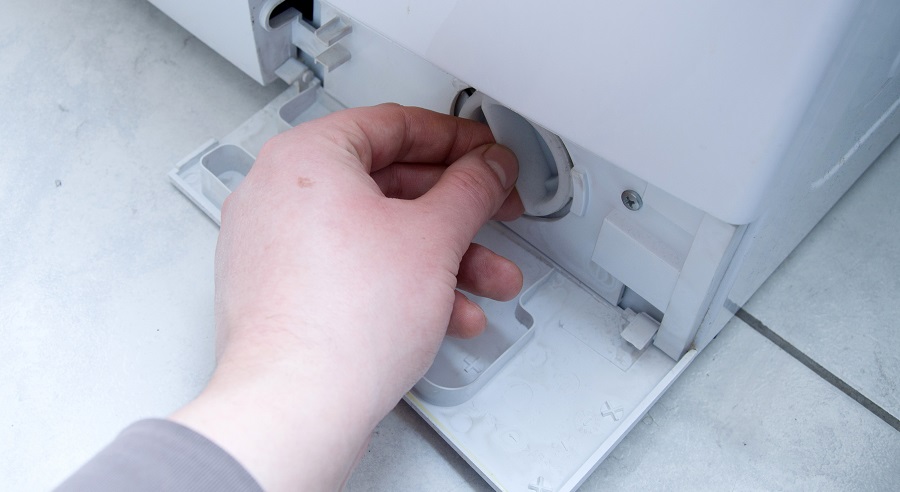


Add a comment