How to change the drum flange of a top-loading washing machine
 The weak point of vertical automatic machines is the drum flange. If it is damaged, washing machine owners will face expensive repairs. Can I change the part myself? What will be required during the work? Let's look into the nuances.
What will be needed for repairs?
It is quite possible to replace the drum flange with your own hands, at home. To repair, you will have to disassemble the top-loading washing machine and remove the drum from it. The process will require the following tools:
- slotted and Phillips screwdrivers;
- screwdriver or drill;
- drills with a diameter of 5 and 6 mm;
- six bolts with an engraver and a washer (M5 or M6);
- wrench.
To replace the drum flange, you need to remove the tank from the vertical housing. This is done like this:
- de-energize the SMA;
- disconnect the vertical line from the water supply and sewerage;
- Use a screwdriver to unscrew the fasteners securing the back wall of the washing machine;
- remove the back panel;

- slide the side panel of the case to the side and remove it too;
- disconnect all pipes and wires from the tank, first photographing the position of each element;
- unscrew the screw holding the shaft;
- close the loading door and remove the tank.
Next, you need to disassemble the tank and remove the drum from it. On top-loading washing machines this is done in the same way as on front-loading washing machines. Next, you can begin replacing the flange.
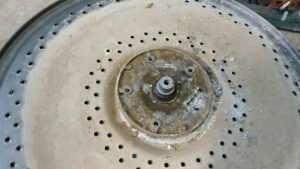
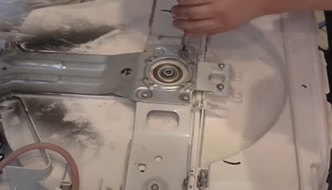
Dismantling a damaged flange
The drum flange is a support for top-loading washing machines. It is installed on the opposite side of the pulley and secured with a set of fasteners.When dismantling, the old element may collapse, and there is nothing to worry about.
When purchasing a flange and repair kit, you need to focus on the model and serial number of a top-loading washing machine.
The easiest way to order components is on the Internet. Today, online stores offer customers absolutely any parts for automatic washing machines, both front-loading and top-loading. You can also try to look for a flange in retail outlets in your city. The average cost of a part is $10-15.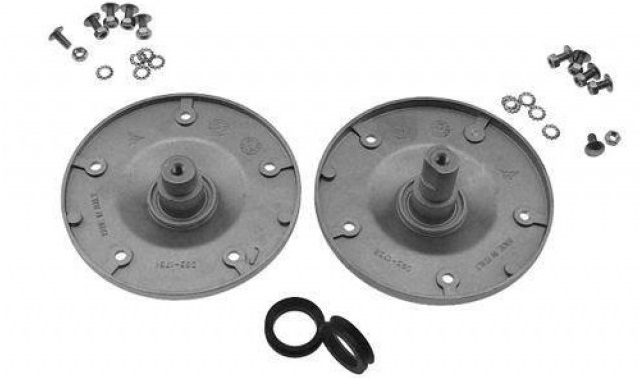
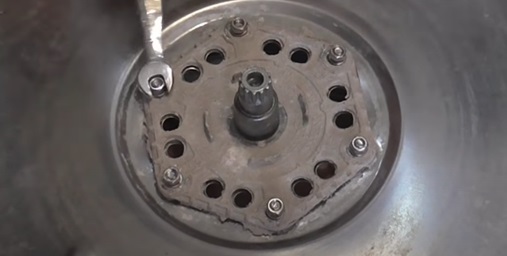
The old flange can be severely damaged, and you should be prepared for this. To remove it, take a drill or screwdriver and insert a drill bit into the tool. Further:
- drill out all 6 riveted fasteners on the flange with a 5 mm drill (this should be done at low speeds so that the drill does not overheat);
- change the drill by installing a six-millimeter drill;
- Drill the same holes with a 6 mm drill.
As a result of these actions, the fasteners will be removed and the flange will be destroyed. Thus, it is enough to simply dismantle the old part. Before installing a new element, the seat must be cleaned of debris, dirt and limescale.
Installing a new flange and assembling the machine
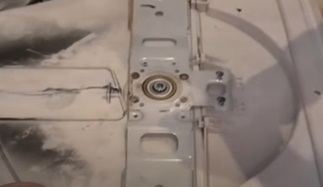
The next step is installing a new flange. You need to prepare six bolts with an engraver and washer and a wrench of the appropriate size. The further algorithm of actions will be as follows:
- place the new flange in place, aligning the holes on the part with the drilled holes on the drum;
- screw the bolts through the engraver into the holes (the flat side should be inside the drum so that in the future the laundry does not cling to the protruding washers);
- tighten each washer with a wrench.
The main difficulty in replacing the drum flange is not in dismantling and installing the part itself, but in disassembling the washing machine. To change the element, you will have to remove the tank from the vertical, and then put the body back together.
After installing the new drum flange, reassemble the top-loading washing machine. The algorithm of actions will be as follows:
- insert the drum into the lower half of the tank;
- install the top part of the tank, assemble the container;
- place the oil seal on the shaft, treat the rubber with a special lubricant, and place a sealing sleeve on top;

- install a horizontal metal strip on top, secure the structure with self-tapping screws;
- put in place another metal strip removed earlier, secure it with three bolts;
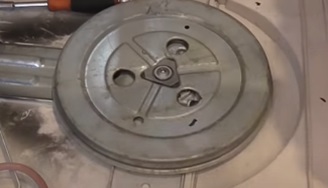
- install the pulley, securing the “drum wheel” with a screw;
- turn the tank over and perform the same actions on the reverse side (install the oil seal and sealing sleeve, treat the assembly with lubricant, install metal strips);
- spin the drum, make sure that nothing interferes with its rotation;
- place the “tank-drum” assembly into the washing machine body;
- connect all previously disconnected parts, pipes and wires to the tank;
- fix the side wall of the case and the rear panel of the “vertical”.
After completing the assembly, run a test wash and observe the operation of the automatic machine.
If everything is done correctly, the machine will start working flawlessly. There should be no extraneous noise when the drum rotates. At the end of the test wash, you can use the vertical machine as usual.
Interesting:


Reader comments
- Share your opinion - leave a comment
Categories
Washing machine repair


For buyers


For users


Dishwasher


Add a comment