How to change the seal of a Bosch washing machine?
Grease drips found on the back wall of the Bosch washing machine tank will tell you that it’s time to change the seal. In most cases, along with the sealing ring, you have to immediately reinstall the bearing. We will describe how the oil seal of a washing machine is replaced and what tools are needed for the job. Let's look at how to properly remove the tank and what mistakes should be avoided in the process.
What is needed for repair?
It is very important to properly prepare for the upcoming repairs. Firstly, you should free up as much space as possible so that you can easily disassemble the Bosch machine. It is better to move the machine to the middle of the room or even move it to the garage. Secondly, you need to have a whole set of tools at hand:
negative and positive screwdrivers;
pliers;
bronze hammer;
set of open-end wrenches;
set of socket heads;
metal pin;
WD-40 aerosol lubricant;
moisture-resistant silicone sealant;
lubricant for the oil seal and MCA components;
puller (if available). The tool will make the repair easier, but you can do it without it.
After making sure that all the necessary equipment is available, you should take care of purchasing replacement components. When selecting parts, you should look not only at the model of the machine Bosch, but also on the size of the seal, type of bearing. All information about this can be found in the technical data sheet of the washing equipment.
It is better to buy spare parts in specialized stores; consultants will help with the choice. You will have to provide the serial number of the car and information about spare parts. The specialist will point out the seal of the appropriate size and select a bearing.You can bring with you parts that have already been removed from the tank, then the chances of buying the “wrong” will be zero.
There is no need to purchase components intended for other models of washing machines. In this case, there is a high probability that the repair will have to be repeated after a very short time.
When you have both replacement parts and all the necessary tools in stock, you can begin repairing it yourself. As already mentioned, it is important to prepare the workplace. It will not be possible to disassemble the machine in a small bathroom; you will have to move the machine to a spacious room. You should take care of the safety of the floor covering; it is better to lay the floor near the washing machine.
What's the smartest way to pull out the tank?
To change the seal, you will have to partially disassemble the Bosch washing machine - remove the top cover, the front panel of the case, disconnect the wires, and remove some elements of the machine. This is necessary to remove the tank-drum assembly from the washing machine. The algorithm of actions will be as follows:
unscrew a pair of screws securing the top cover of the unit, remove the panel and set it aside;
remove the powder receptacle. It would be a good idea to immediately clean the cuvette from plaque and detergent residues;
Unscrew the bolts around the perimeter of the control panel;
Carefully, so as not to break the wiring, place the panel on top of the Bosch machine;
using a screwdriver, unclip the plastic clips holding the bottom trim panel and remove it;
open the hatch door;
loosen the clamp securing the sealing collar of the tank, remove the metal ring from the body;
disconnect the UBL contacts, remove the sensor;
Unscrew the screws holding the front wall of the washer. The bolts are located behind the dispenser, the drain valve, around the perimeter of the housing and behind the control panel.
After this, removing the front wall of the washing machine will not be difficult. Now you have access to the main tank of the washing machine.
Before removing the tank, be sure to disconnect the wires connecting the unit to other parts of the Bosch machine and remove the fasteners.
Let's clarify what clamps and wires we are talking about. Need to disconnect:
filling valve mounting;
drain pipe;
wiring connecting the unit with the heating element, engine, pump;
counterweights;
level sensor tube;
damper mountings.
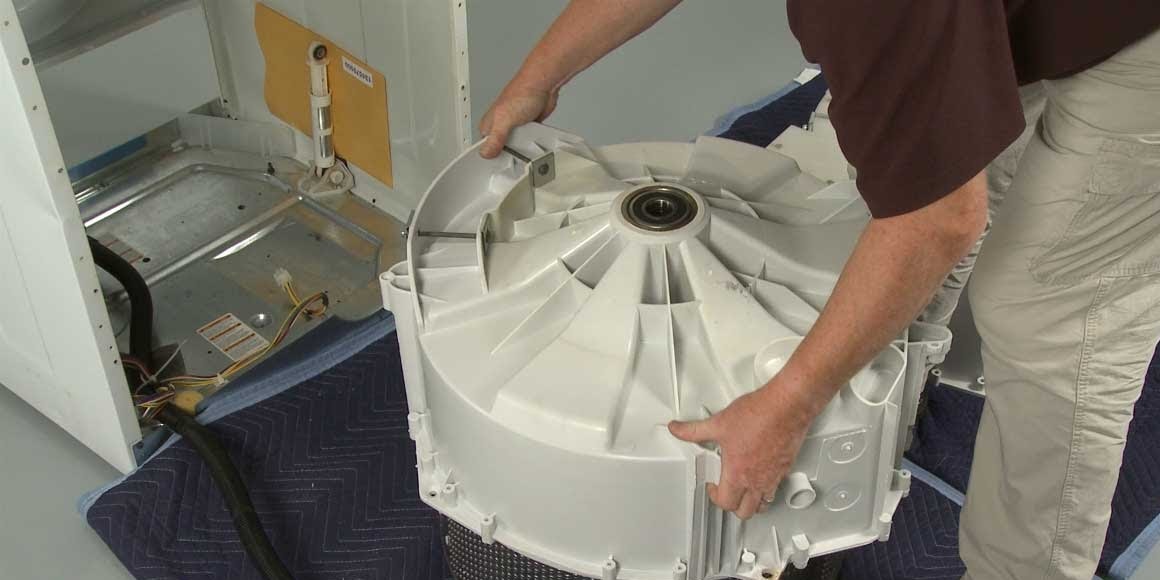
Now you can begin to remove the unit from the Bosch washing machine. It is advisable to do this not alone, but with four hands. An assistant will need to press down the shock-absorbing springs, while a second person will pull out the tank. In principle, you can do the job only with your own hands, without inviting an “assistant”.
“Halve” a plastic container
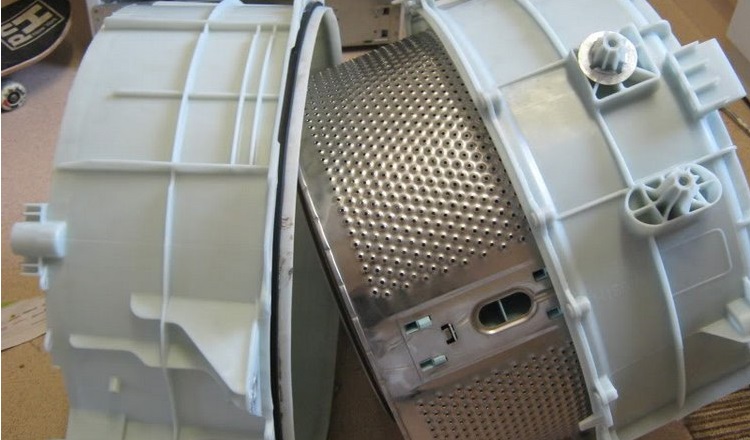
Fortunately, the tank of German washing machines is collapsible. To divide the container, you do not have to saw it along the seam, and this significantly simplifies the work of replacing the washing machine seal. It is easy to disassemble the tank - you need to unscrew the screws holding the halves together and release the special latches.
If you have difficulty removing the fasteners, you can treat them with WD-40 aerosol.
Next, unscrew the main mounting screw. After this, remove the drum pulley and put the main bolt back in place. Then lean the metal pin prepared in advance against the screw and start hitting the rod with a hammer with a bronze head to knock out the shaft. Work carefully to avoid deformation of the shaft. Otherwise, there will be a significant increase in the cost of repairs.
We replace worn parts
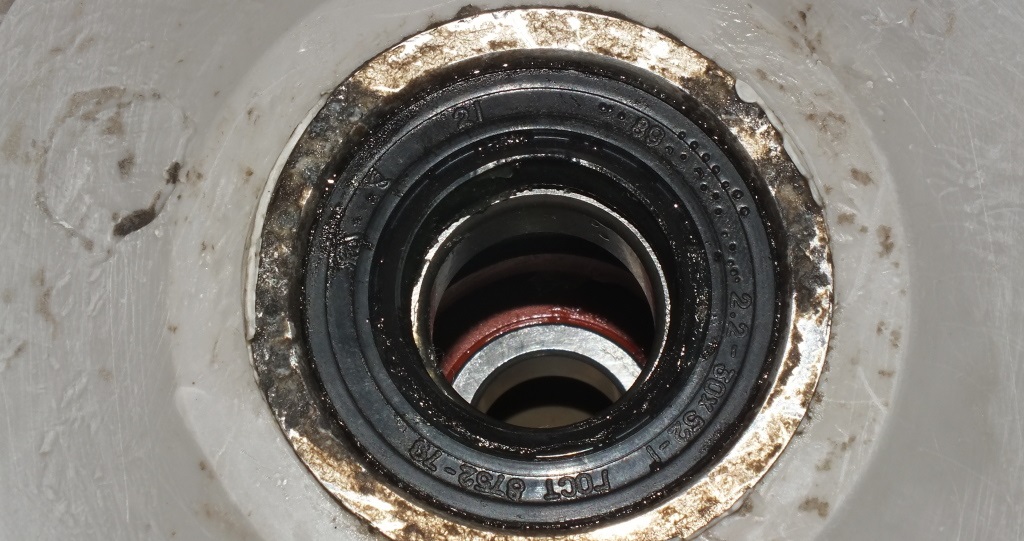
When the tank is disassembled, you should proceed to removing worn parts and installing new parts. It is the rear part of the assembly that needs to be worked on. Carefully inspect the half; in the center you can see a seal - an oil seal. The ring is very easily removed from its seat using a screwdriver.
Changing a bearing is more difficult. You'll have to knock it out using a metal pin. The tip of the rod is placed on the edge of the ring and tapped with a bronze hammer. It is necessary to “beat” the bearing along the entire circumference, gradually rearranging the rod. The steps are repeated until the element is retrieved.
If you have a special puller key, removing the bearing will be even easier and safer.
After removing the metal ring, it is necessary to clean the opened hole from debris, dirt, and oil residues. The bearing and oil seal must be installed in a clean place.
It's time to start installing new parts. First of all, the bearing is taken. Be sure to treat the parts and seat with a special lubricant for the oil seal and components of the washing machine that come into contact with water. It is very important. By saving on lubricant, you will reduce the service life of the seal.
The lubricated bearing should be inserted into the hole and carefully driven into it. Next, the oil seal is installed, which must also be pre-treated with lubricant. This measure will prevent water from entering the bearing during further operation of the equipment.
It is advisable to treat the washer shaft with water-repellent lubricant. Only after this you should remember to run a couple of “idle” cycles so as not to stain the things in the drum. Assembly of the unit is carried out in the reverse order.
When fastening the halves of the tank, it is better to apply silicone sealant to the connecting seam, and only then snap the latches and screw in the screws around the perimeter. This will increase the reliability of the design. Next, you can begin to return the unit inside the machine, connecting the previously disconnected wiring, and the removed fasteners. Afterwards, the walls of the case, the control panel, and the powder receptacle are installed in place, and the test wash is started.
Common mistakes
If this is your first time doing your own repair of a Bosch washing machine, the risk of making a mistake during the work is quite high. To prevent a small mistake from spoiling the situation, you should figure out what “newbies” most often make mistakes and try to prevent this.
We are talking about the following omissions:
inaccurate removal of the front wall of the Bosch machine, as a result of which the UBL wiring breaks;
damage to the cuff when “pulling” it out of the washing machine with the clamp not loosened;
deformation of the “drum wheel” when it is carelessly removed from the shaft;
Damage to fasteners when removing them with enormous force. If the bolt does not budge, it is better to treat it with universal lubricant WD-40, and then calmly unscrew it;
broken wiring leading to the thermostat;
tearing out the filling pipe along with the water intake hose;
Damage to the drum surface due to careless knocking out of the bearing. As a result of such an error, the container will have to be replaced, and this will lead to a multiple increase in the cost of repairs.
Therefore, first think about whether you can cope with the upcoming workload. Remember that replacing the oil seal and bearing is not so easy. You will have to disassemble the body of the machine, remember the wiring diagram, disconnect them, pull out and disconnect the tank, and then put the machine back together.The repair will take a beginner several hours. If it’s easier for you to pay the technician about 3-4 thousand, then you can contact the service center and not be bothered by a replacement.
 Grease drips found on the back wall of the Bosch washing machine tank will tell you that it’s time to change the seal. In most cases, along with the sealing ring, you have to immediately reinstall the bearing. We will describe how the oil seal of a washing machine is replaced and what tools are needed for the job. Let's look at how to properly remove the tank and what mistakes should be avoided in the process.
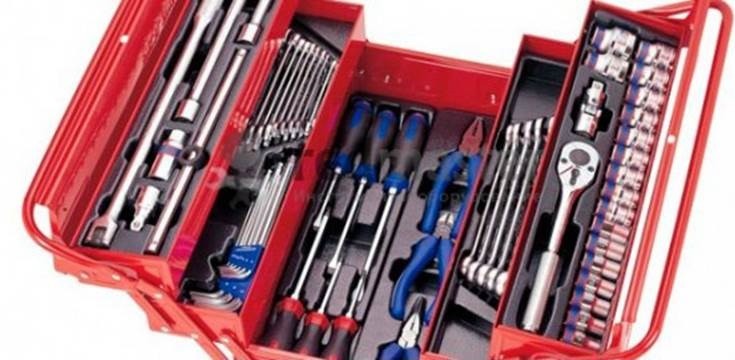


Add a comment